Zapier Integration
Our built-in Workflows cover many common automation scenarios directly within TemplateDocs.
TemplateDocs can be used together with Zapier to create complete document workflows. This page includes a step by step guide to walk you through the process.
Overview
To illustrate this process, we will use a "Member Onboarding" scenario:
- New member submits their information through a Google Form
- Zapier automatically triggers TemplateDocs to generate a customized welcome document
- TemplateDocs creates the document in PDF format and emails it directly to the new member
See how it works:
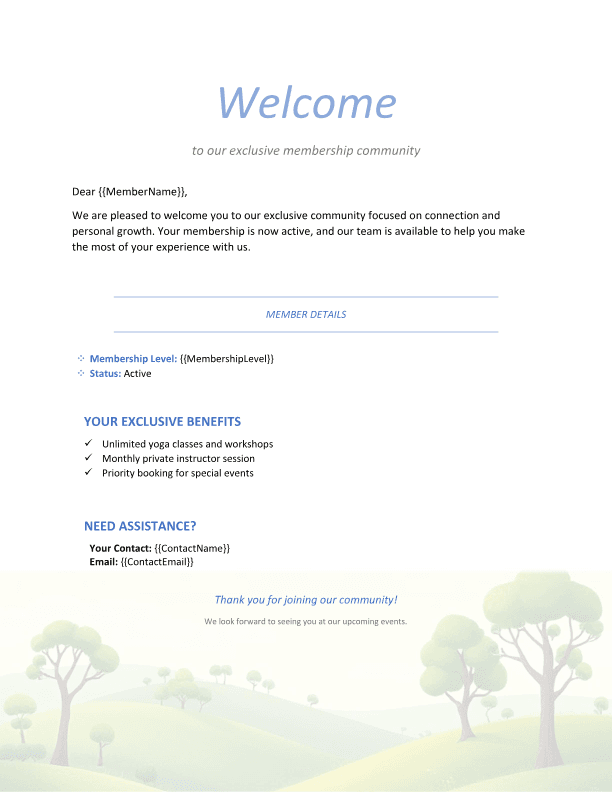
Step 1: Add the Member Onboarding template
Download the Member Onboarding template and upload it to your TemplateDocs account.

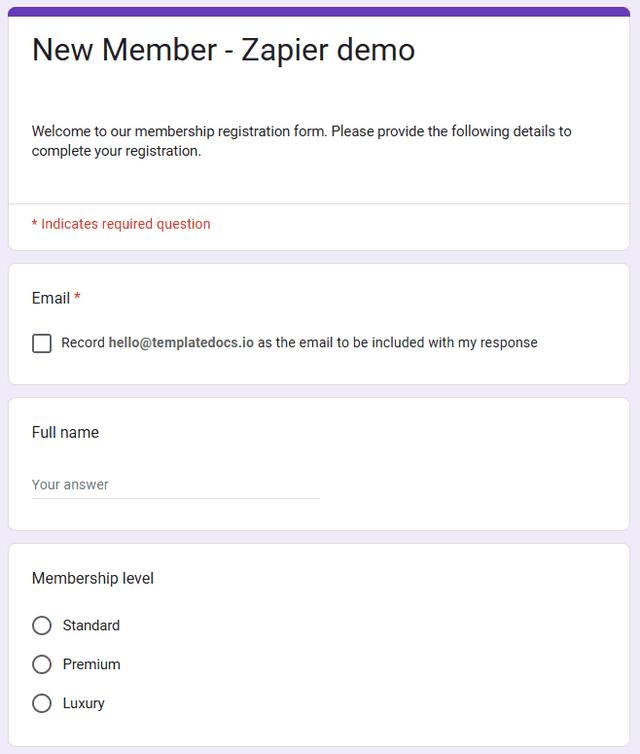
Step 2: Set up your Google Form
Create a Google Form to collect new member information. Include fields that correspond to the placeholders in the template:
- Email Address
- Full Name
- Membership Level (dropdown with your membership tiers)

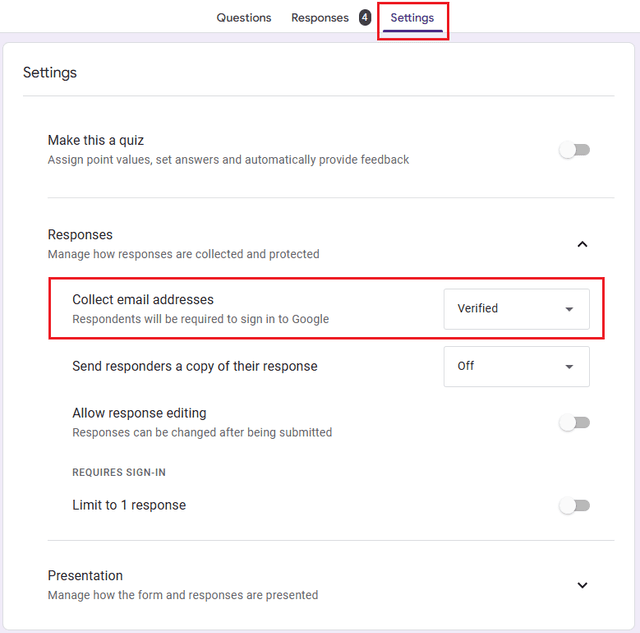
Make sure to enable the option to collect email addresses if you plan to send the welcome document directly to new members:

Step 3: Create your Zap in Zapier
A. Start a new Zap
Log in to Zapier, click the + Create button and select Zaps
B. Set up your Trigger
- Choose Google Forms as your trigger app
- Select New Form Response as the trigger event
- Connect your Google account if not already connected
- Select the Google Form that's collecting your form responses
C. Set up your Action
- Choose TemplateDocs as your action app
- Select Generate Document as the action event
- Connect your TemplateDocs account if not already connected
- You will be asked to provide your TemplateDocs API key. You can find it in the API Keys page.
D. Configure the Action
General fields:
- Template: Select your Member Onboarding template
- Output Format: PDF / DOCX
Email fields (optional):
- Send Email: Check this option to automatically email the generated document
- To: Connect to the Respondent Email field from your Google Form
- Subject: Customize the email subject (e.g., "Welcome to our organization!")
- Body: Customize the default email message (optional)
Template Data fields:
- MemberName: Connect to the Full Name field from your Google Form
- MembershipLevel: Connect to the Membership Level field from your Google Form
- ContactPerson: Type in a name of a contact person in your organization
- ContactEmail: Type in an email address for the contact person
Step 4: Test and activate your Zap
- Send a test submission through your Google Form
- Review the generated welcome document
The Final Result
When a new member submits the Google Form, a personalized welcome document is automatically created and emailed directly to them. The document includes:
- Their name and membership details
- Information about their membership benefits
- Contact information for support
This automation saves your team time, ensures consistency in your onboarding process, and provides new members with immediate confirmation of their membership. The built-in email delivery means you don't need to set up additional email services - TemplateDocs handles everything for you.
Additional Tips
- Add your organization's branding, colors, and logos to the template
- Include links to important resources or next steps for new members
- Set up additional Zap steps to add the member to your CRM or marketing platform
- For configuring custom SMTP settings, check out our email delivery documentation
Try next
Zapier connects TemplateDocs to thousands of apps. Here are some popular workflows to try next: