Trigger Zapier from TemplateDocs Workflows
TemplateDocs can trigger Zapier automations as part of a workflow. This allows you to send data to thousands of other apps immediately after a document is generated or a form is submitted.
This page includes a step by step guide to walk you through the process.
If you want the opposite direction (Zapier → TemplateDocs), see Generate Documents from Zapier.
Overview
To illustrate this process, we will use a "Quote Request" scenario:
- A client submits a TemplateDocs Form to request a quote.
- TemplateDocs generates the quote document and immediately triggers a Zap.
- Zapier updates your CRM (Notion in this example) with the quote details and the document link.
See how it works:
Step 1: Add the Quote Request template
Download the Quote Request template and upload it to your TemplateDocs account.

Step 2: Create a Workflow in TemplateDocs
-
Open your TemplateDocs account and create a new workflow.
-
Choose Add Document Templates and select the Quote Request template.
TemplateDocs will create two default steps:
- Trigger - Quote Request Form
- Email - Send Email
-
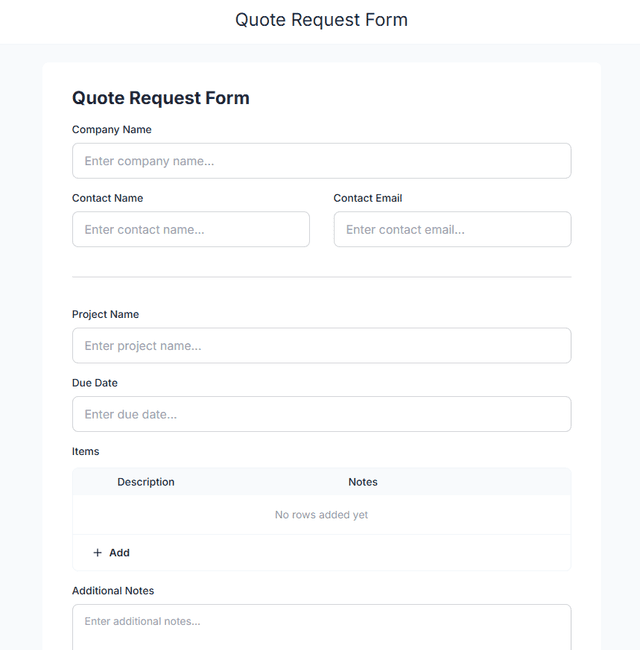
Edit the form in the Trigger step to match the appearance you want for your quote request form.
-
Remove the Email step. We will send the document to Zapier instead.
Step 3: Create a Zapier webhook trigger
- Log in to Zapier
- Click the + Create button and select Zaps
- Choose Webhooks by Zapier as your Zap's trigger app
- Select Catch Hook as the Event and click Continue
- Zapier will provide a Webhook URL. Copy this URL - you will need it in the next step.
Step 4: Add an HTTP step in your TemplateDocs workflow
In TemplateDocs, open your workflow and add a Send HTTP request step:
- Method:
POST - URL: paste the Zapier webhook URL
- Body Type: choose
Document - Content Type: choose
Form Data - Document: select the document you want to send ("Quote Request" in this example)
- Additional Form Data Fields: add any additional fields you want to send to Zapier.
As an example, we will add the following fields (use the
@symbol to reference form fields and variables):- Date: Map to the Current Date & Time workflow variable
- Company: Map to the Company Name form field
- Contact: Map to the Contact Email form field
Step 5: Send a test request
- Click the Trigger Form button in the upper right corner of the workflow editor.
- Fill in the form and click Submit.
Step 6: Map the fields in your Zap
- Back in Zapier, click the Webhooks by Zapier task and click Test Trigger.
- You should see the request we've just sent in the Requests tab. Click the request and then click Continue with selected record.
You can now map the fields in your Zap and add whatever Zapier actions you need. Lets continue with our Notion example.
Step 7: Create a new Notion database
- Log in to Notion.
- In the left sidebar, under Private click + Add new and select Empty database.
- Add the following fields to the database:
- Date: Date
- Company: Text
- Contact: Email
- Request Doc: Files & Media
Step 8: Connect your Notion database to your Zap
- Back in Zapier, add a Notion task.
- For Action Event, select Create Data Source Item.
- Link your Notion account and click Continue.
- For Data Source, select the database you created in the previous step.
- Map the trigger fields to the Notion database fields:
- Company: Map to the Company field
- Request Doc: Map to the File field (this field was automatically added by TemplateDocs)
- Contact: Map to the Contact field
- Date: Map to the Date field
- Click Continue and then click Test Step.
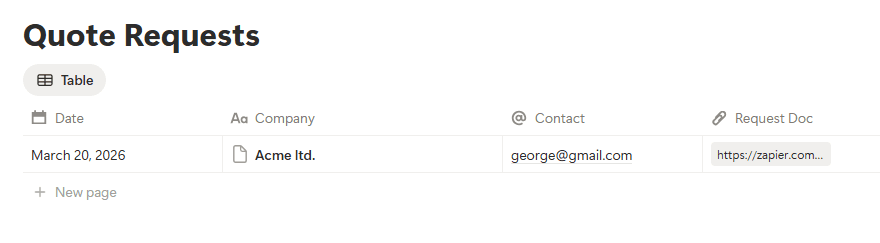
Go back to your Notion database and you should see the new database item.
Step 9: Publish your workflow
- In Zapier, publish your workflow by clicking the Publish button.
- If you wish your TemplateDocs form to be public, you can publish it by clicking the Publish button in the TemplateDocs workflow editor. Otherwise, it will remain private and only accessible to you and your team through the private trigger form.
The Final Result
When a new quote request is submitted, a personalized quote request document is automatically created and added to your Notion database.
In this demo, generated documents are accessible through Zapier default storage for a limited time. To keep them long-term, add a storage step in your Zap (such as Google Drive, Dropbox, or S3).