How to generate lease agreements automatically from your CRM
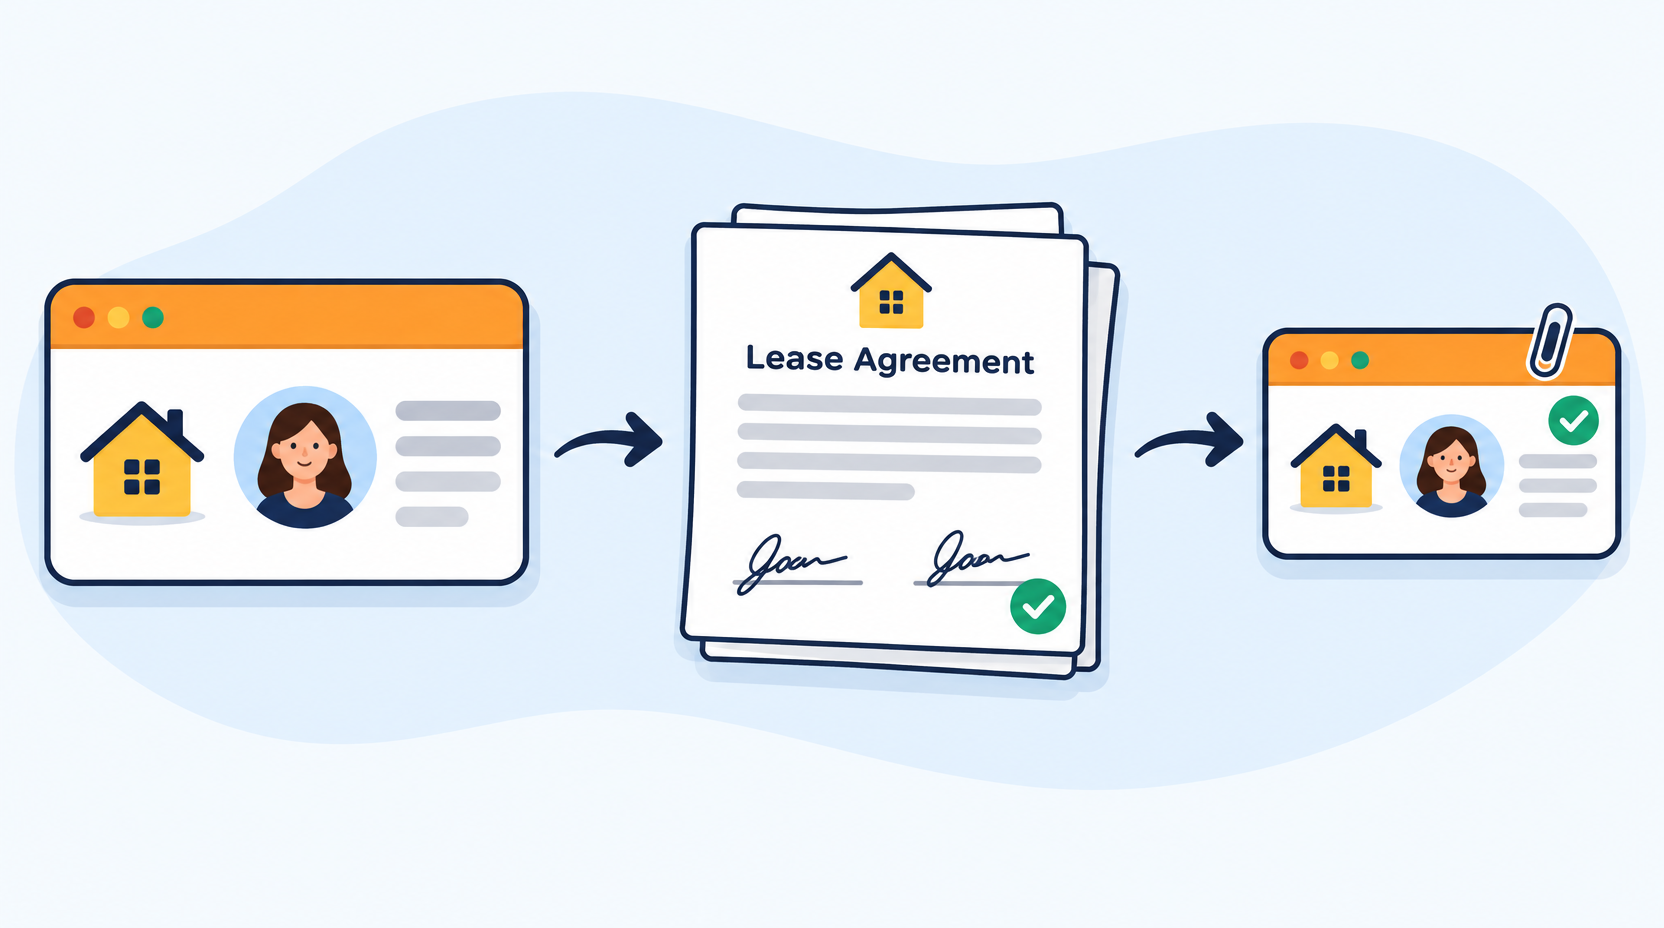
Learn how to generate PDF lease agreements from Word templates, automatically send them for e-signature, and save signed copies back to your CRM.
To generate lease agreements automatically, turn your lease into a Word template
with placeholders like {{ TenantName }} and {{ MonthlyRent }}, keep the
lease details in your CRM, and use a document automation platform that creates a
PDF lease agreement from each deal. With TemplateDocs you can select a deal from
HubSpot, Attio and many other CRMs to fill in the lease, or generate it
automatically when the deal reaches a specific stage. The tenant and the
landlord then get the PDF to e-sign, and the signed copy is saved back to the
deal.
This guide uses HubSpot as an example. The same flow works with Airtable, Attio, Google Sheets, monday.com and many other apps and CRMs.
In this article:
- What to look for when generating lease agreements from your CRM
- Step 1: Turn your lease agreement into a template
- Step 2: Choose how to generate
- Other CRMs and data sources
- Frequently asked questions
What to look for when generating lease agreements from your CRM
Many tools can fill in a template. To generate lease agreements from your CRM without copying data by hand, check that the tool you use can:
- Use your own lease. Start from your existing Word lease, with your clauses, fonts and logo, instead of a fixed set of built-in forms.
- Read from your CRM. Fill in the property, the tenant and the lease terms straight from a deal and its contact.
- Generate Word and PDF files. Create editable Word documents for review and negotiation or final PDFs ready for signing.
- Collect signatures. Send the lease agreement for e-signature in the same flow, without a separate e-signature tool.
- Write back to your CRM. Attach the signed lease to the deal and move it to the next stage.
- Handle different terms. Include clauses, such as a pet clause, only when they apply.
TemplateDocs covers all of these. The steps below show how.
Step 1: Turn your lease agreement into a template
Start from your own lease agreement in Word, or download the sample lease below. Replace every detail that changes per lease with a tag in double curly braces:
| In the lease | Tag |
|---|---|
| Property address | {{ PropertyAddress }} |
| Landlord and tenant names | {{ LandlordName }}, {{ TenantName }} |
| Lease start and end dates | {{ StartDate }}, {{ EndDate }} |
| Rent and deposit | {{ MonthlyRent }}, {{ SecurityDeposit }} |
| Signatures | {{ TenantSignature }}, {{ LandlordSignature }} |
| Signing dates | {{ TenantDateSigned }}, {{ LandlordDateSigned }} |
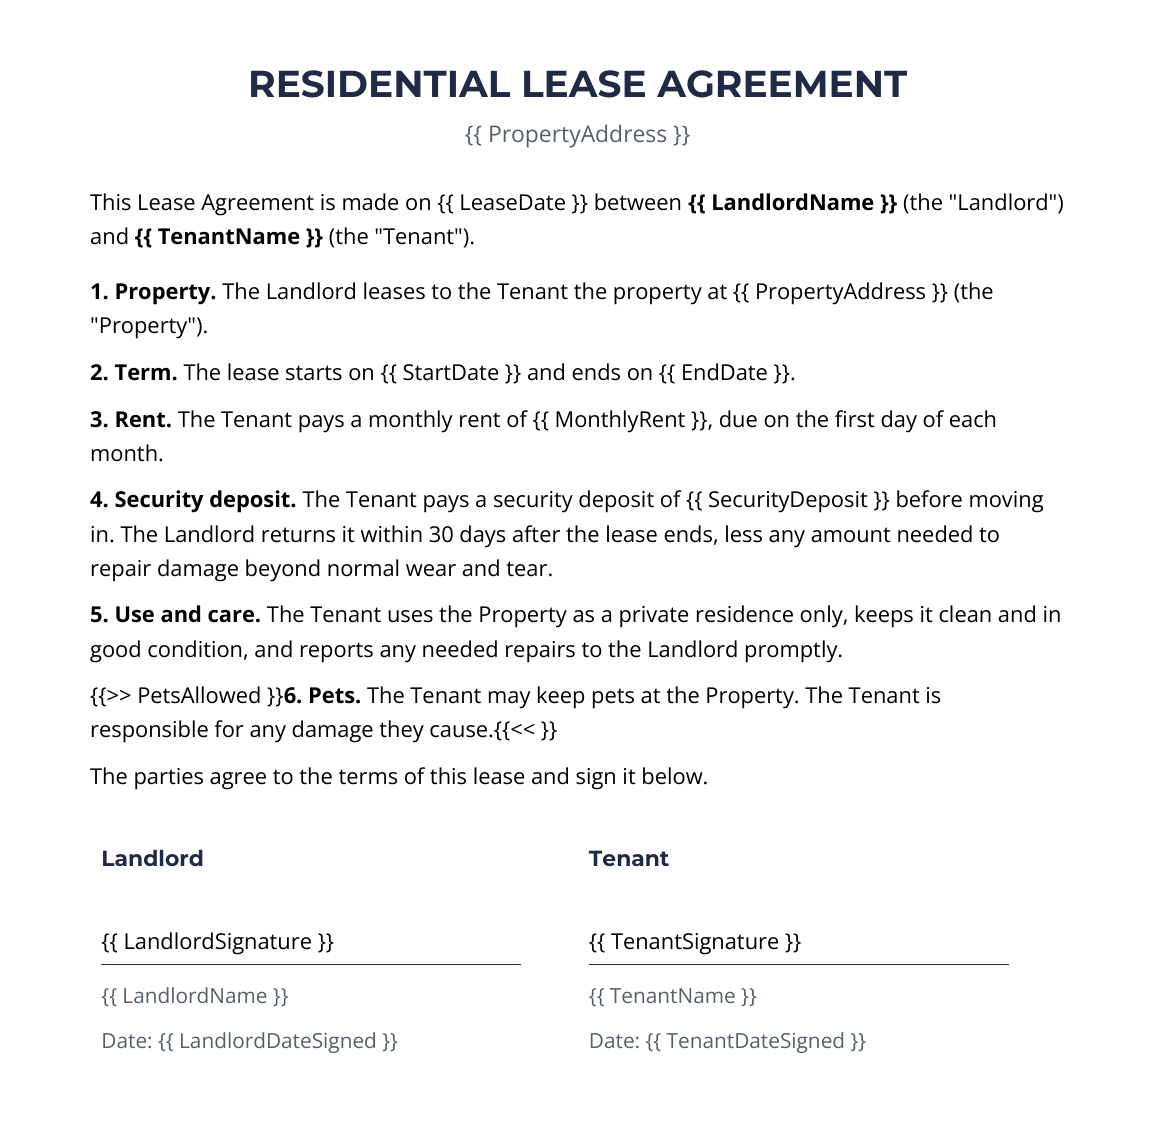
Click the lease to download it as a Word template.
A few tips for preparing your template:
- Use descriptive signature tags. Tags like
TenantSignatureandTenantDateSignedare automatically recognized as signature fields, so TemplateDocs sets up the e-signature for you. See Signature Tags. - Use conditions for optional clauses. The sample's pet clause sits
between
{{>> PetsAllowed }}and{{ << }}, so it appears only when pets are allowed. See Conditions. - Format your tags. The generated document preserves the font and style of each tag, so format it the way you want the resulting value to appear.
Instead of adding tags manually, you can create a template with AI. Upload your existing Word lease and let AI identify the details that change from tenancy to tenancy and replace them with tags.
Step 2: Choose how to generate
There are two ways to generate lease agreements from your CRM. Both create a PDF, send it to the tenant and the landlord to e-sign, and can save the signed copy to the deal.
| Option A: Deal you select | Option B: Deal stage | |
|---|---|---|
| How it starts | An agent selects a deal through an online form | A deal moves to a specific stage in your CRM |
| Review before sending | Yes, any value can be changed in the form | Optional, the workflow starts automatically and you can choose to review before sending |
| Best for | Leases with negotiated terms, such as custom rent or dates | Standard leases and high volume |
Option A: Generate a lease agreement from a deal you select
An agent opens a form, selects the deal from your CRM, and the form fills itself in with the property, the lease terms and the tenant's details. They check the values, change anything they need, and submit. The lease agreement is then generated as a PDF and sent to the tenant and the landlord to sign.
1. Create the workflow from the template
- Open the lease template. On the Overview tab, choose Collect with a form.
- Choose Start from a record and click Continue.
- Choose HubSpot and click Continue.
- Keep Collect signatures on. It's suggested because the template has signature tags.
- Keep Send an email on, and enter your office's address as the Recipient to get a copy of every signed lease. Name the workflow and click Create workflow.
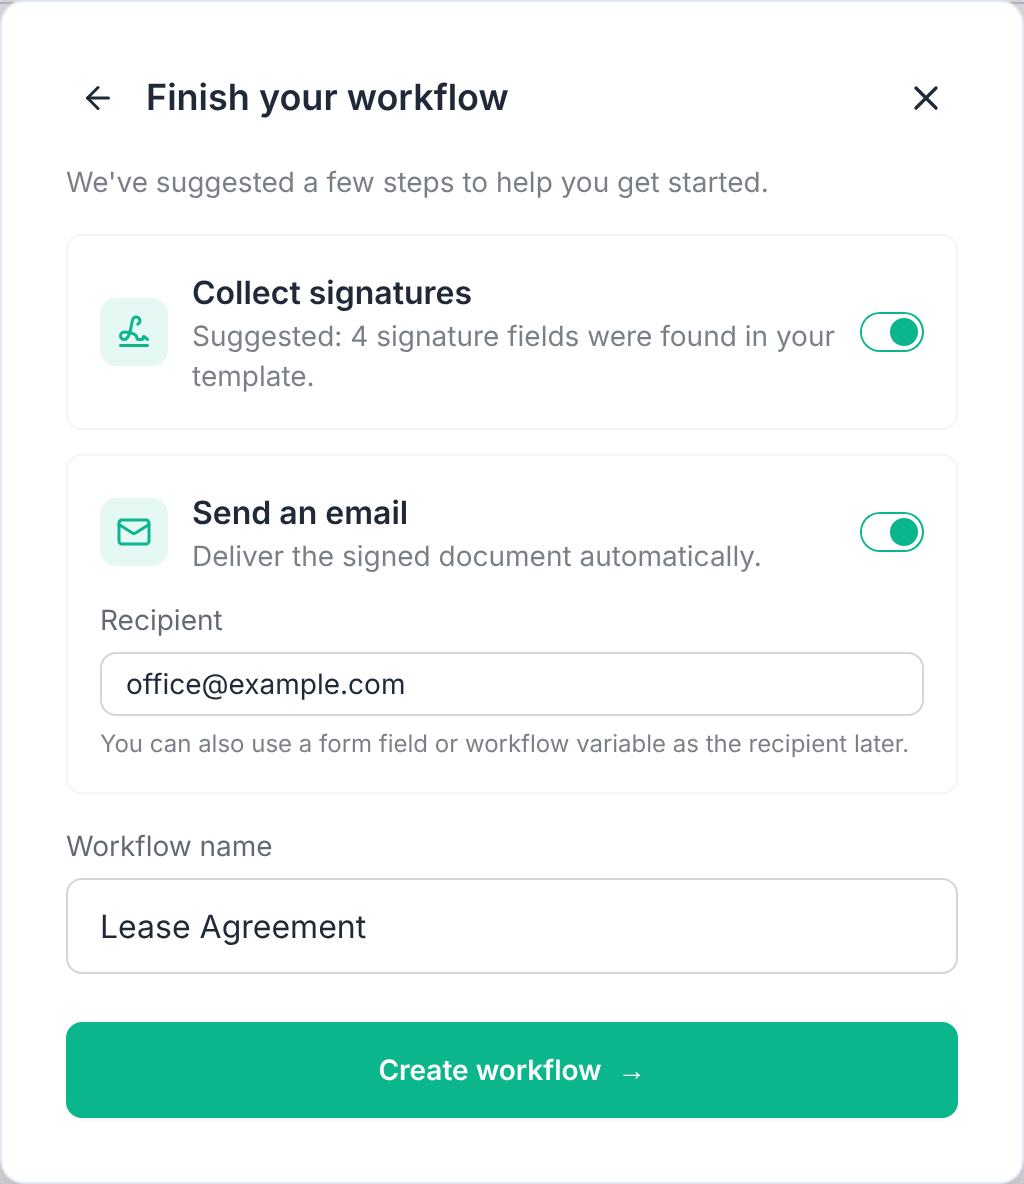
TemplateDocs creates a workflow with a form that has a field for every tag, a Document step that generates the lease as a PDF, a Sign step with the signature fields already placed, and an Email step that sends the signed lease. The form designer opens with the Data Sources panel, ready to connect HubSpot.
2. Connect your HubSpot deals
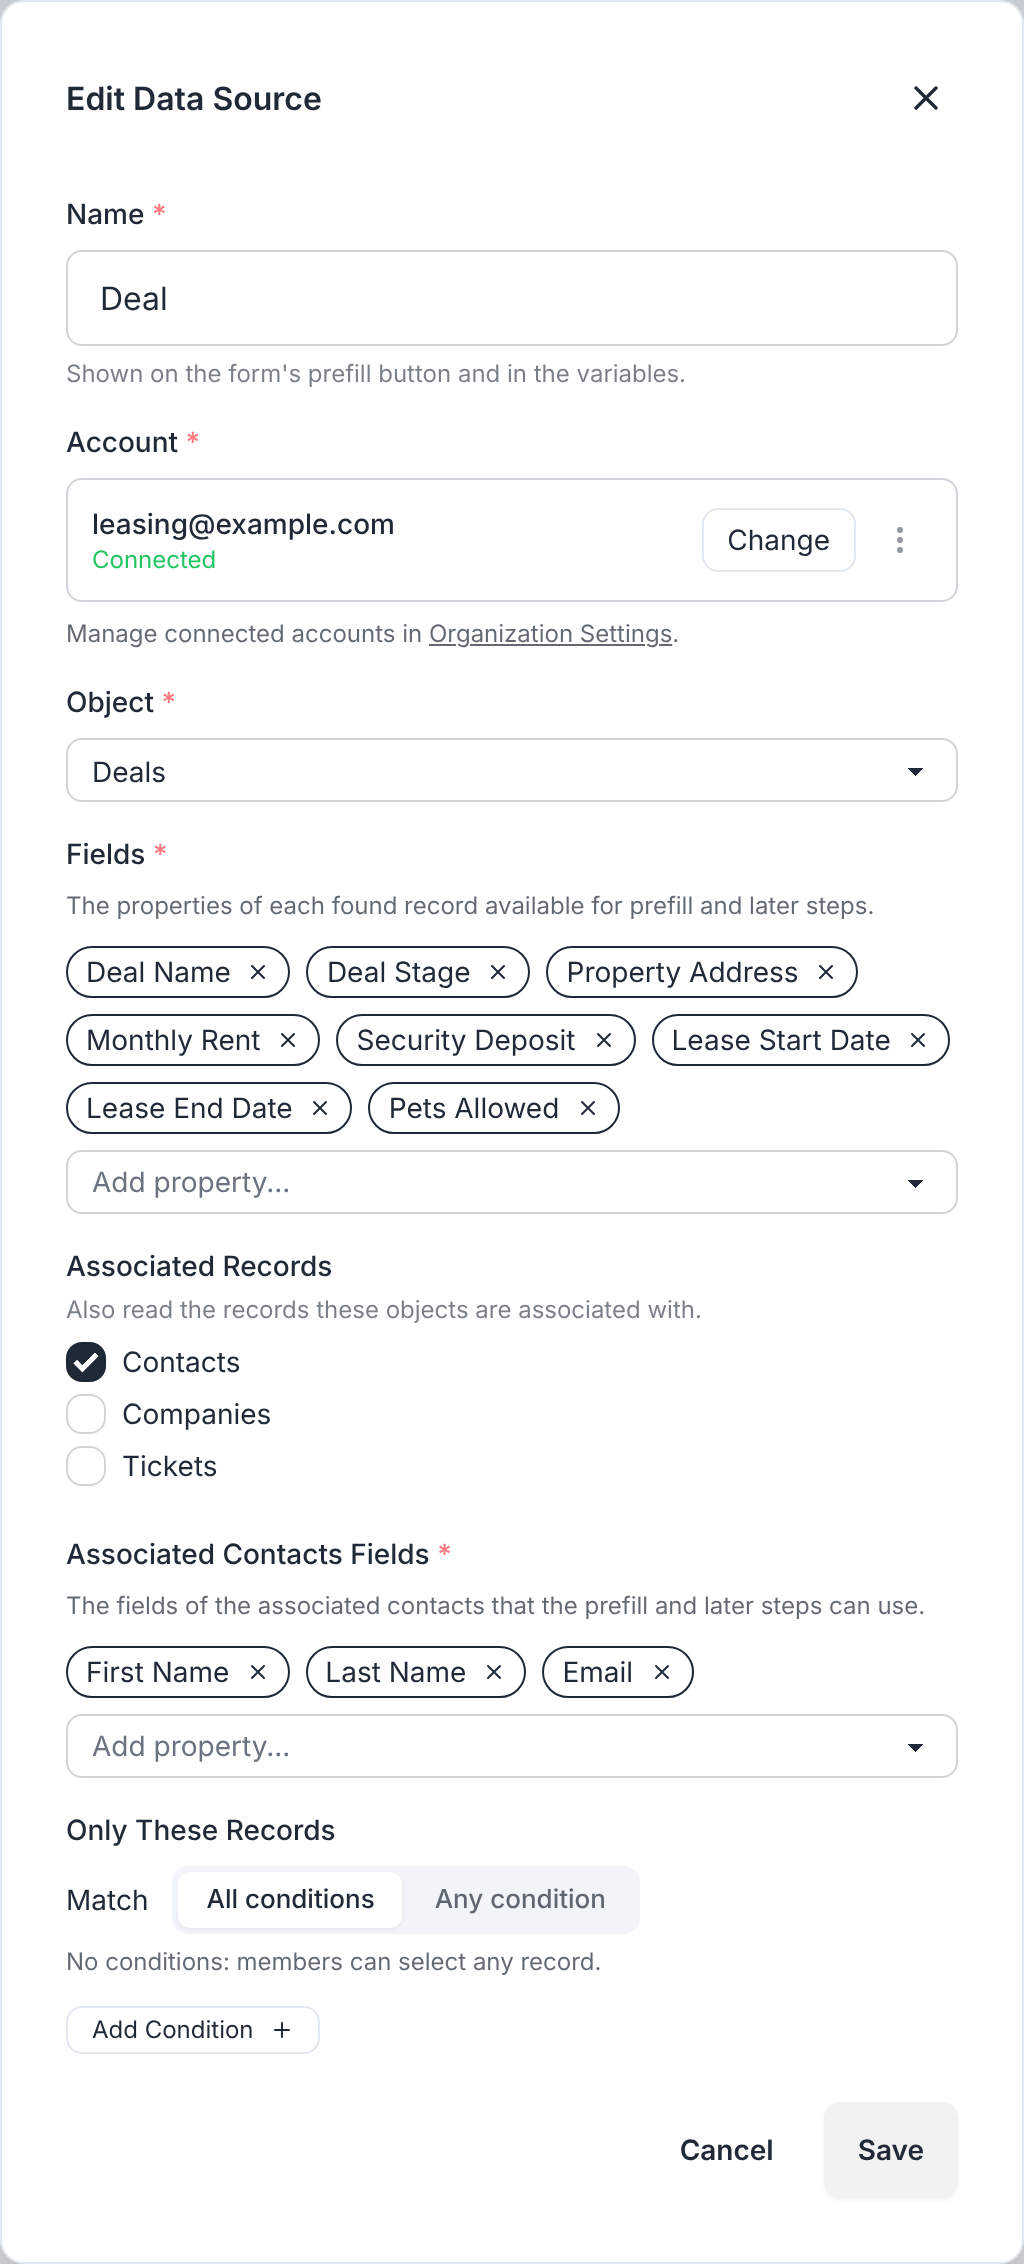
- In the Data Sources panel, click the edit button of the HubSpot source.
- Name it
Deal, so it is easy to find later. - Click Sign in under Account and approve the access in HubSpot.
- Choose Deals as the Object.
- Under Fields, add the deal properties that hold the lease terms, such as Property Address, Monthly Rent and Lease Start Date.
- Under Associated Records, check Contacts. The form can then read the tenant's name and email along with the deal.
- Click Save.
3. Auto-populate the form fields
Select each form field and set its Prefill value. Type @ and select the
deal property under Source Records > Deal.
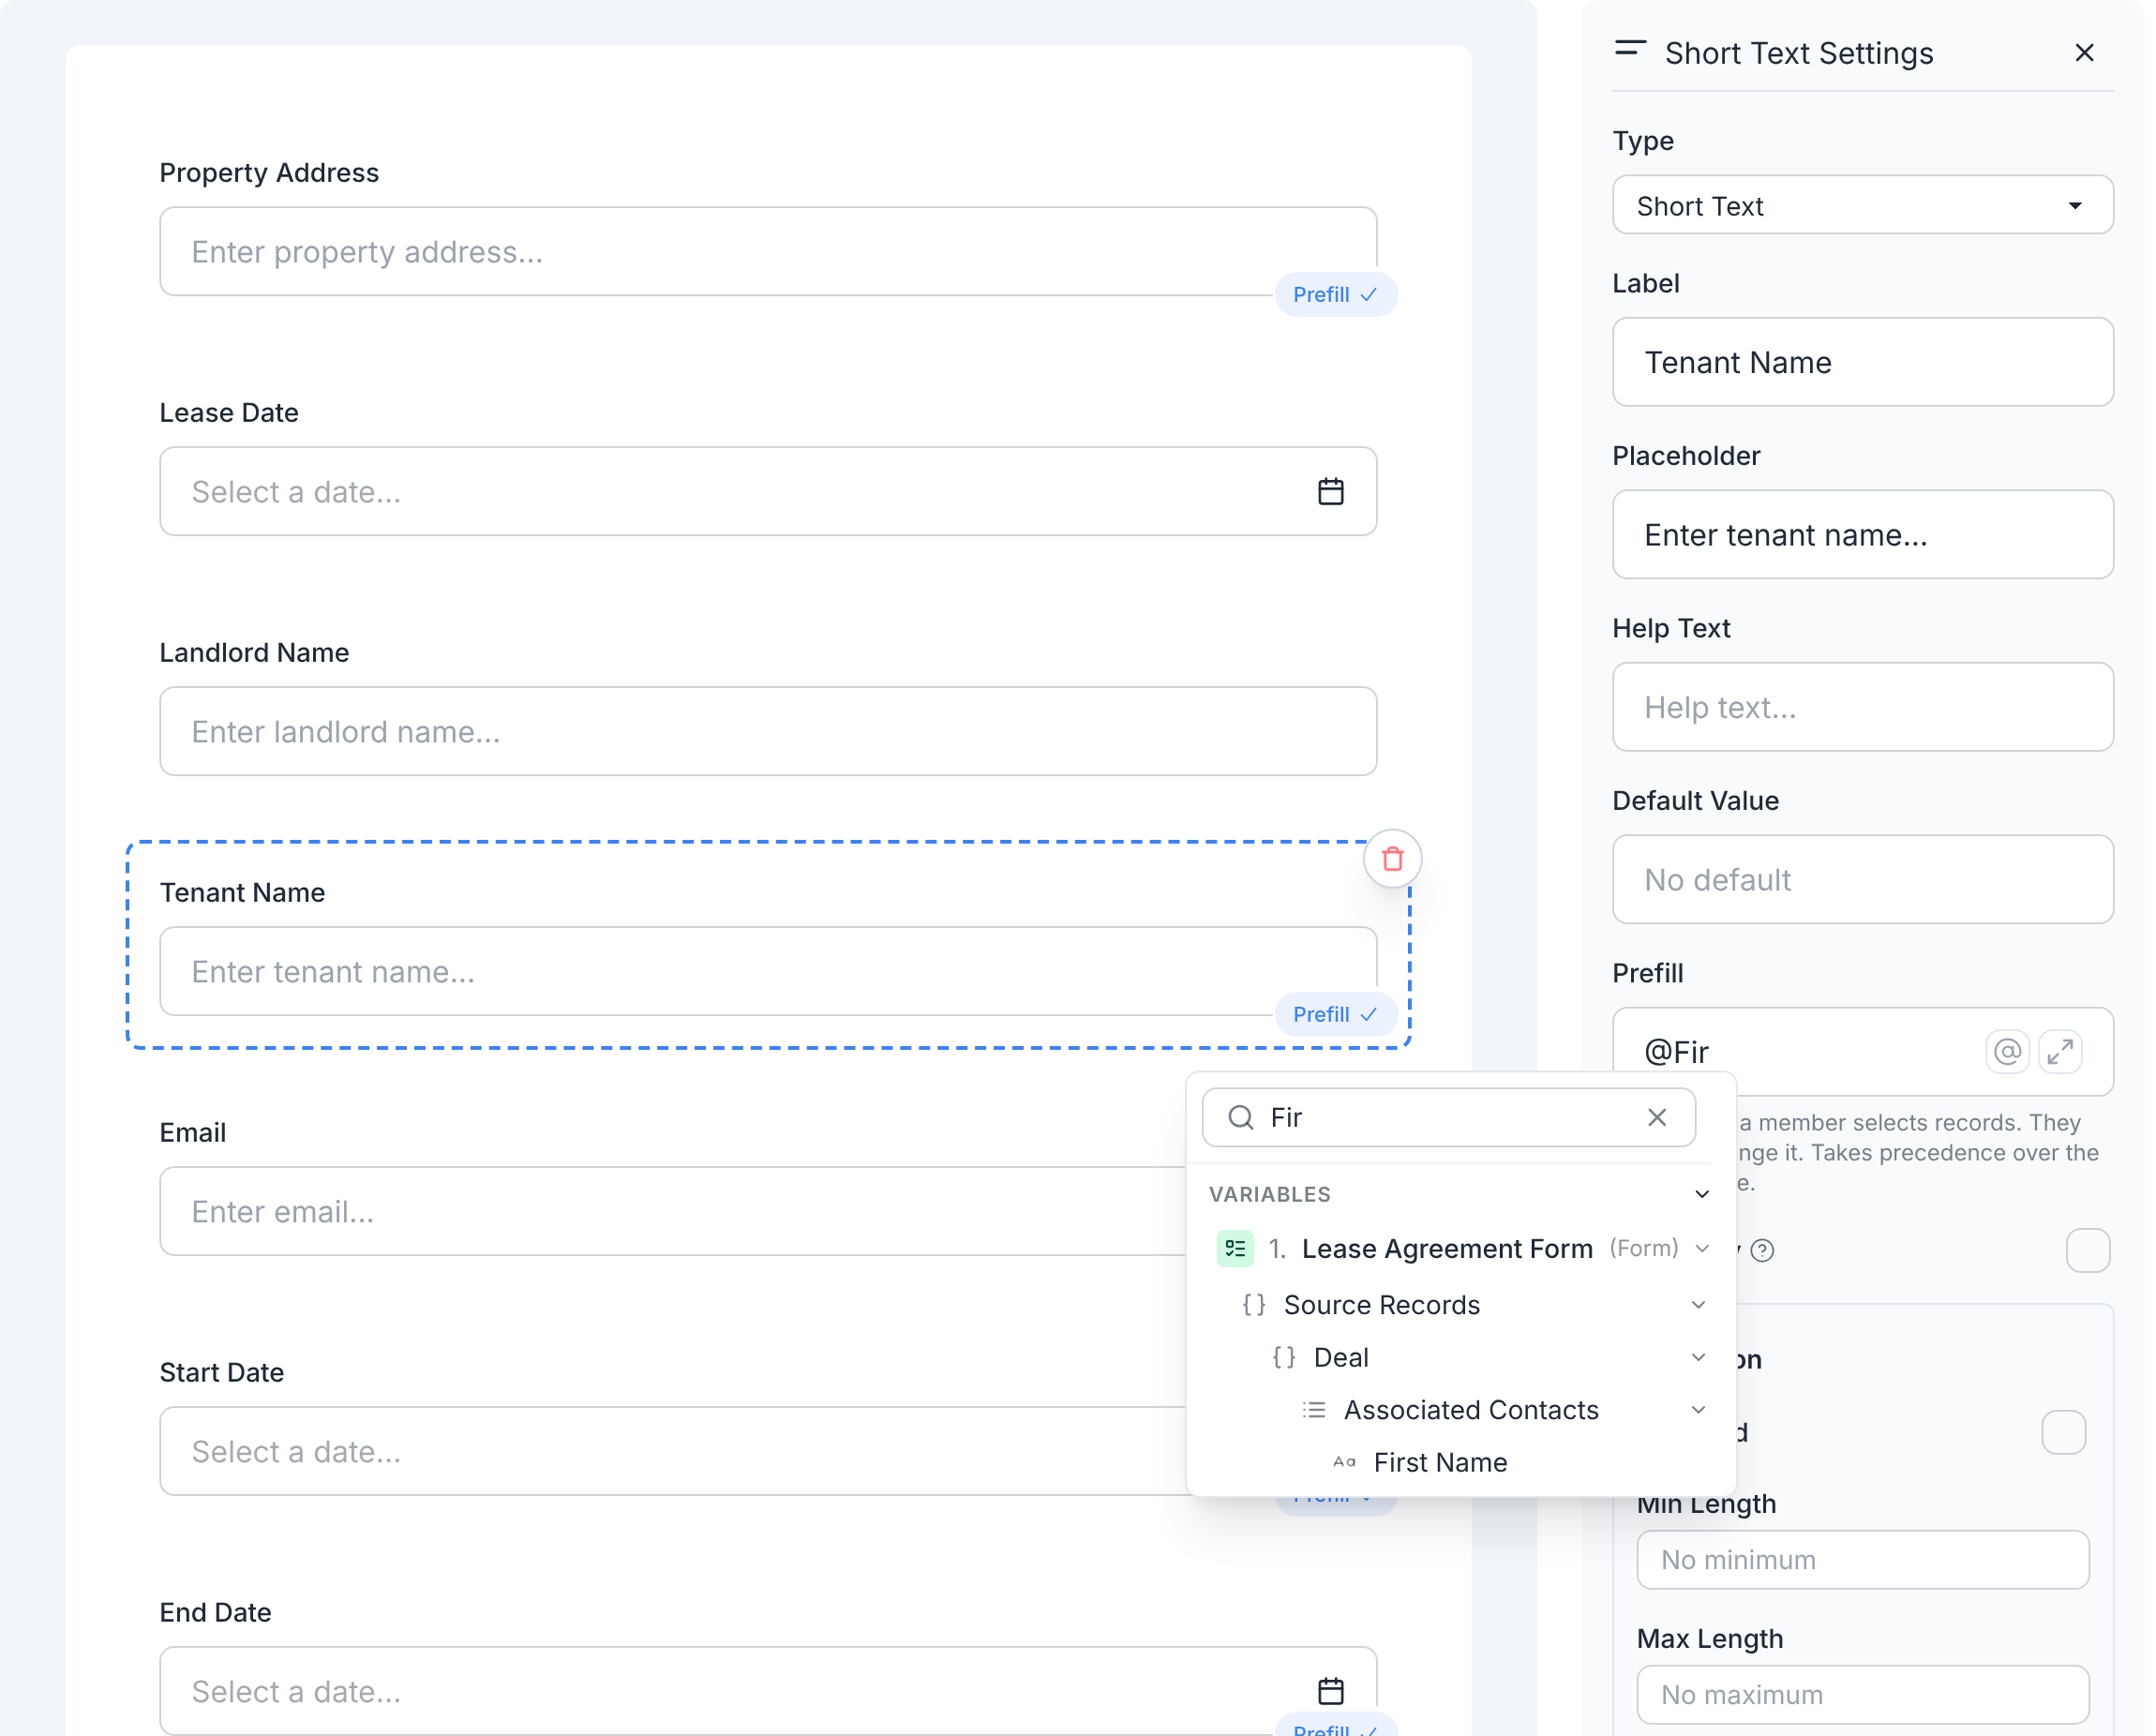
Then add an Email field for the tenant's address, and prefill it with Associated Contacts > Email. The Sign step sends the lease to it.
Leave Lease Date and Landlord Name without a prefill. The agent fills them in, or you can give Landlord Name a Default Value.
To control how dates and amounts look in the lease, such as
December 1, 2026 or $1,850.00, use a
formula in the field's Prefill.
4. Send the lease agreement for e-signature
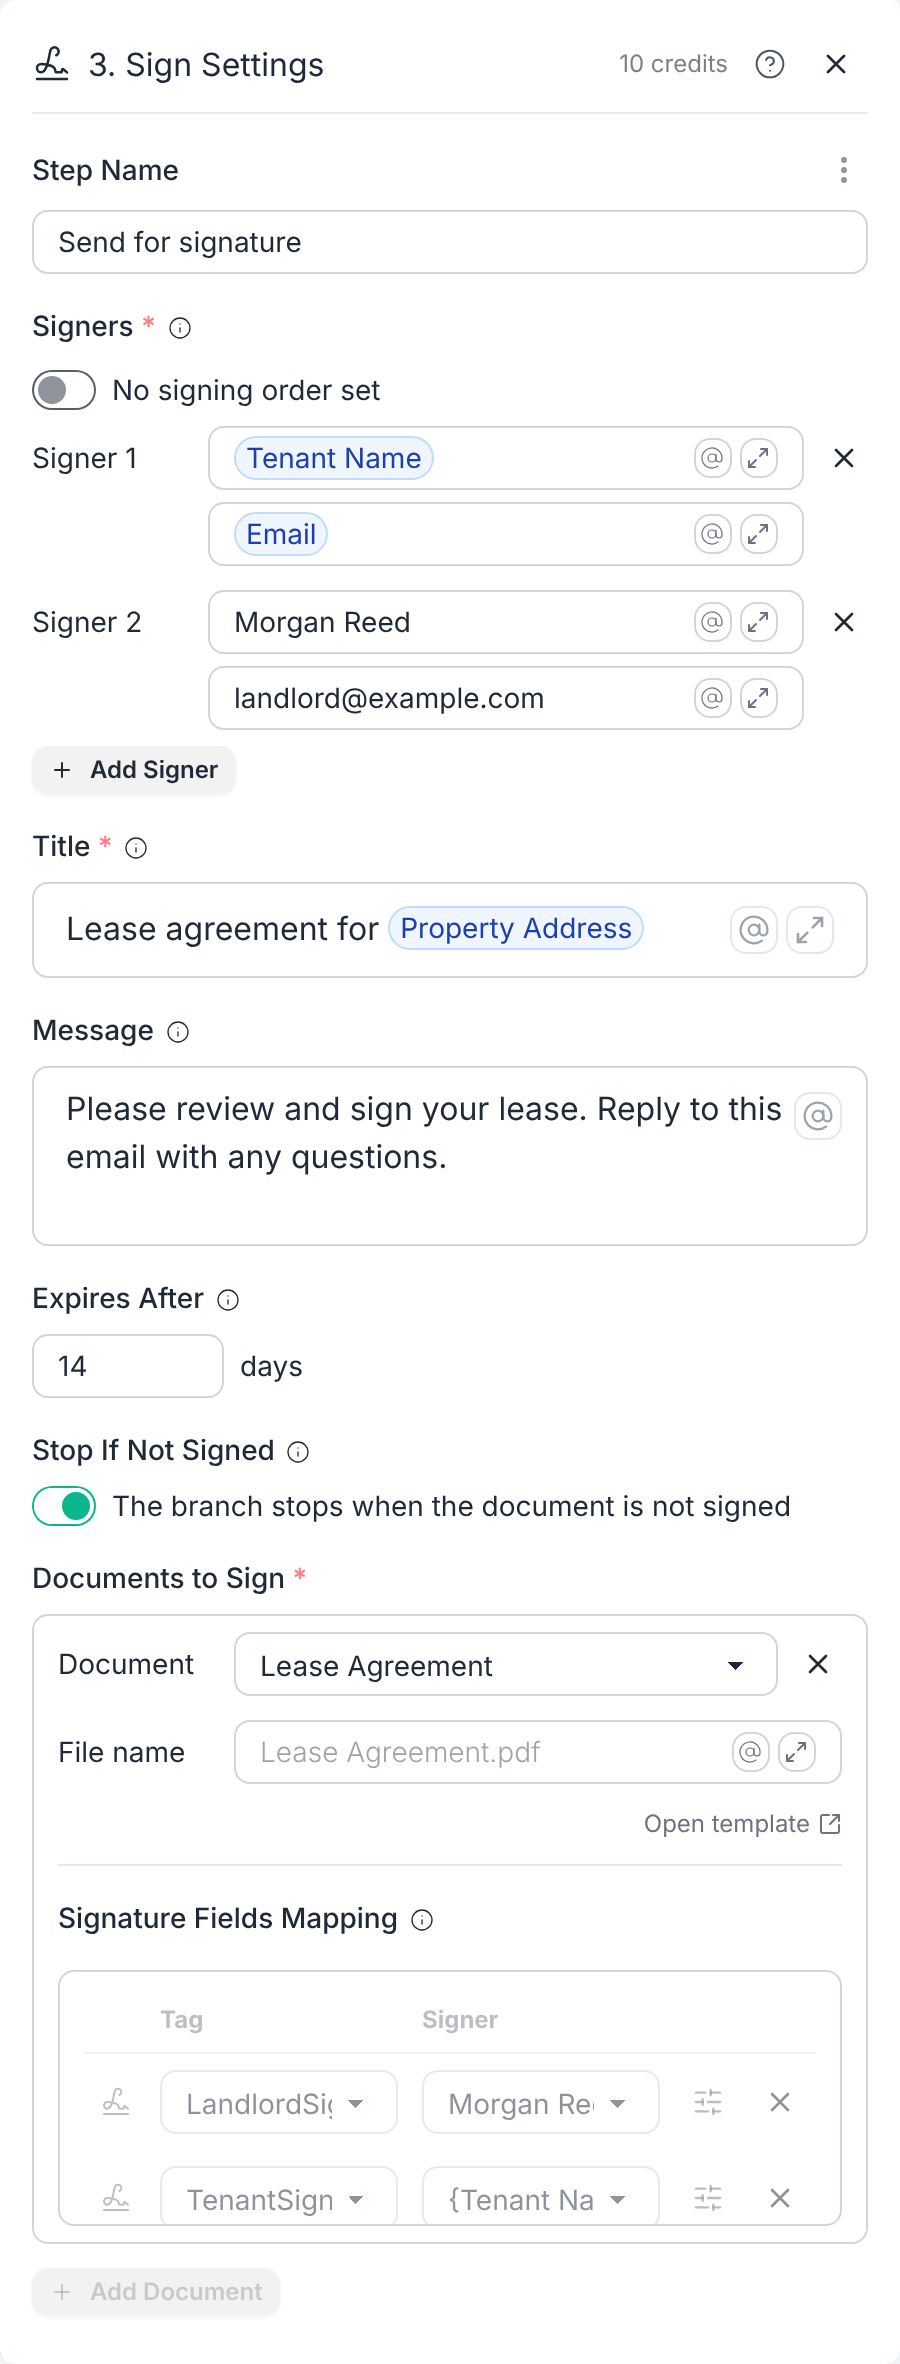
The wizard has already set up most of the Sign step. Now, tell it who signs:
- Under Signers, set the first signer's name to the Tenant Name form
field and the email to the Email form field. Type
@to insert them. - Click Add Signer and enter the landlord's or property manager's name and email.
- To have the tenant sign first, turn on the signing order. See Sign step for all the settings.
- Click the document's mapping preview to open Signature Fields. On the
Fields tab, assign the fields on the
LandlordSignatureandLandlordDateSignedtags to the landlord. - Set a Title and optionally add a Message.
- If needed, change Expires After. Signers have 7 days to sign by default.
5. Save the signed lease agreement back to the deal (optional)
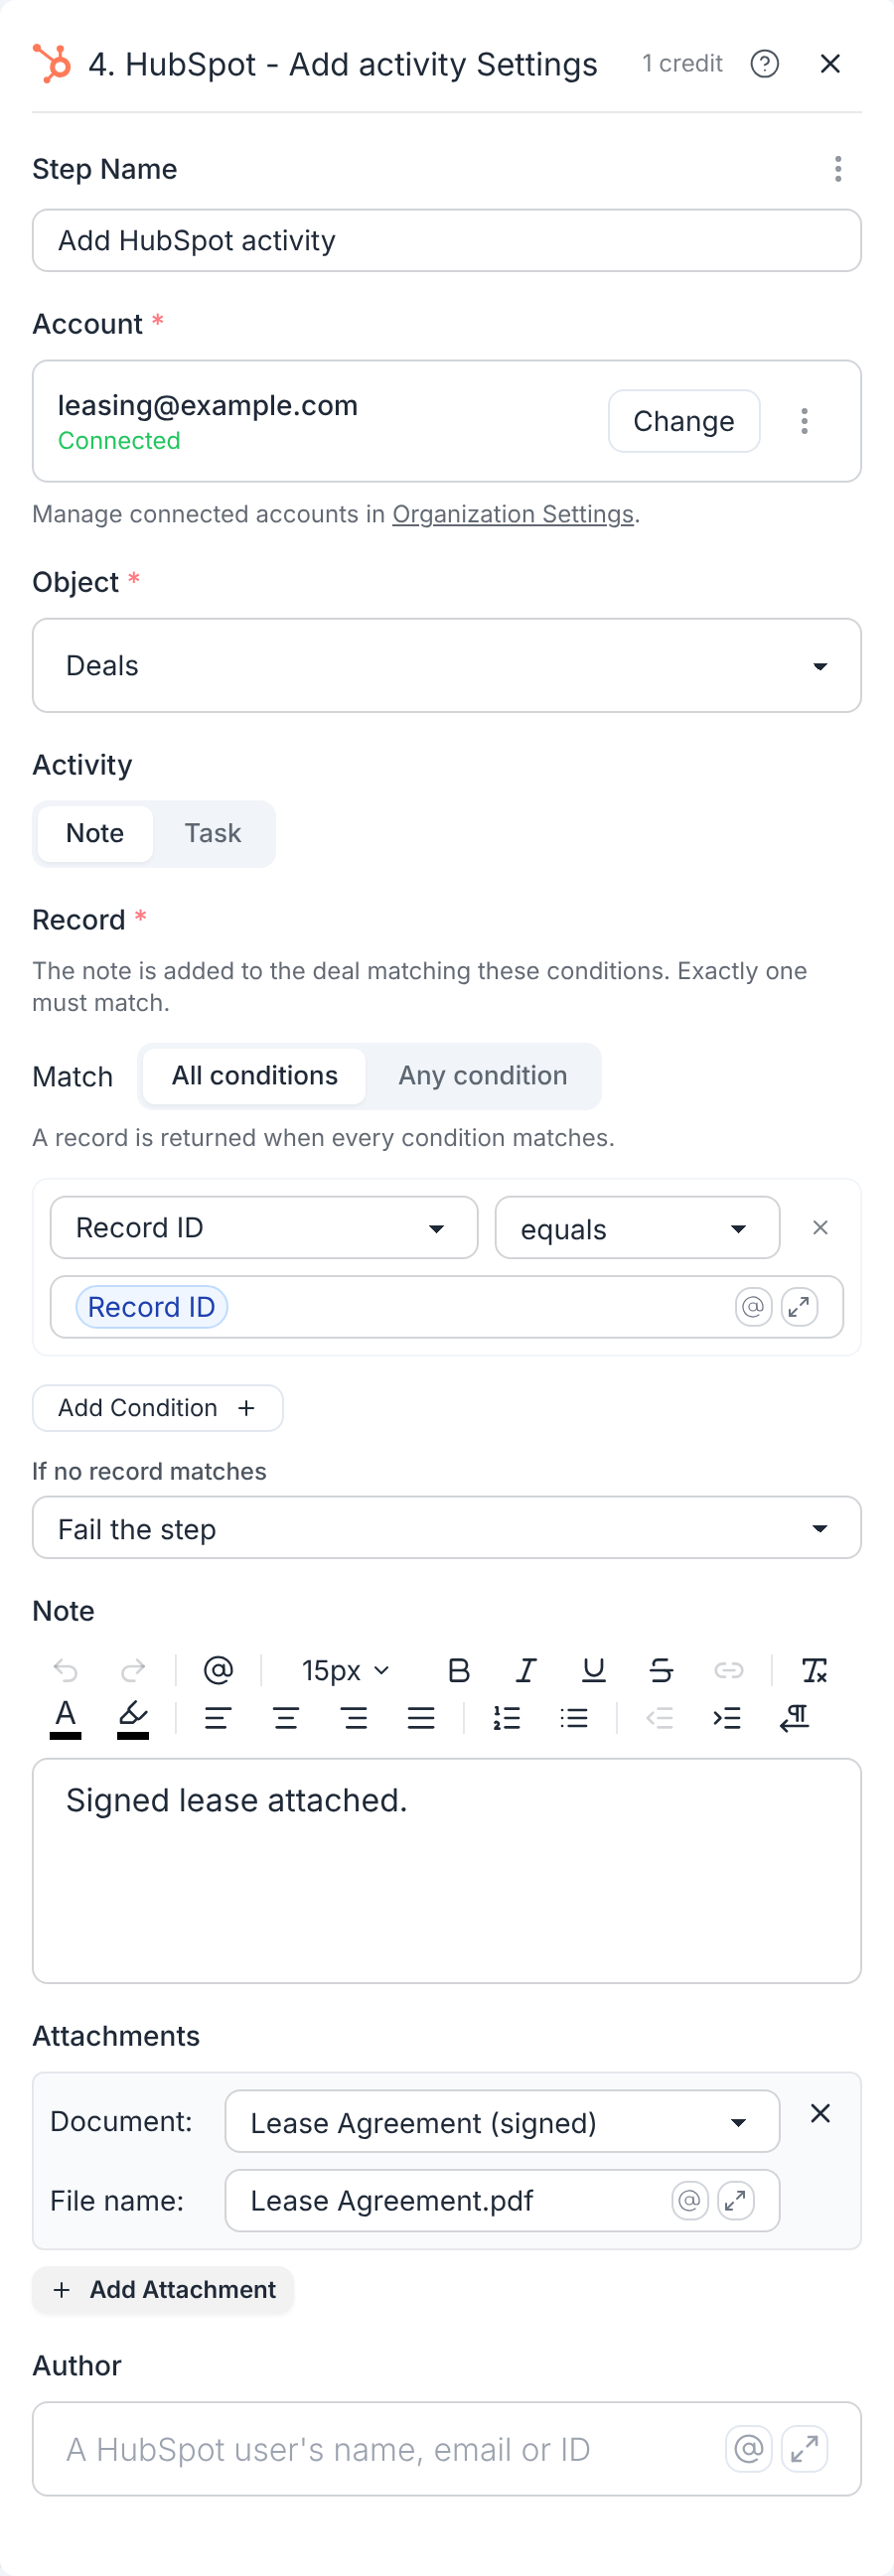
The workflow continues once everyone has signed. To save the signed lease back to the deal, add a HubSpot - Add activity step after the Sign step:
- Choose Deals and the Note activity.
- Under Record, set a condition so the right deal gets the note:
Select "Record ID is", then type@and select the deal's Record ID from the form's Source Records. - Under Attachments, add the signed lease. The note appears on the deal's timeline, with the lease attached.
To move the deal forward too, add a HubSpot - Write record step that updates the same deal, and set its Deal Stage to the desired stage, such as "Lease signed".
6. Generate your first lease agreement
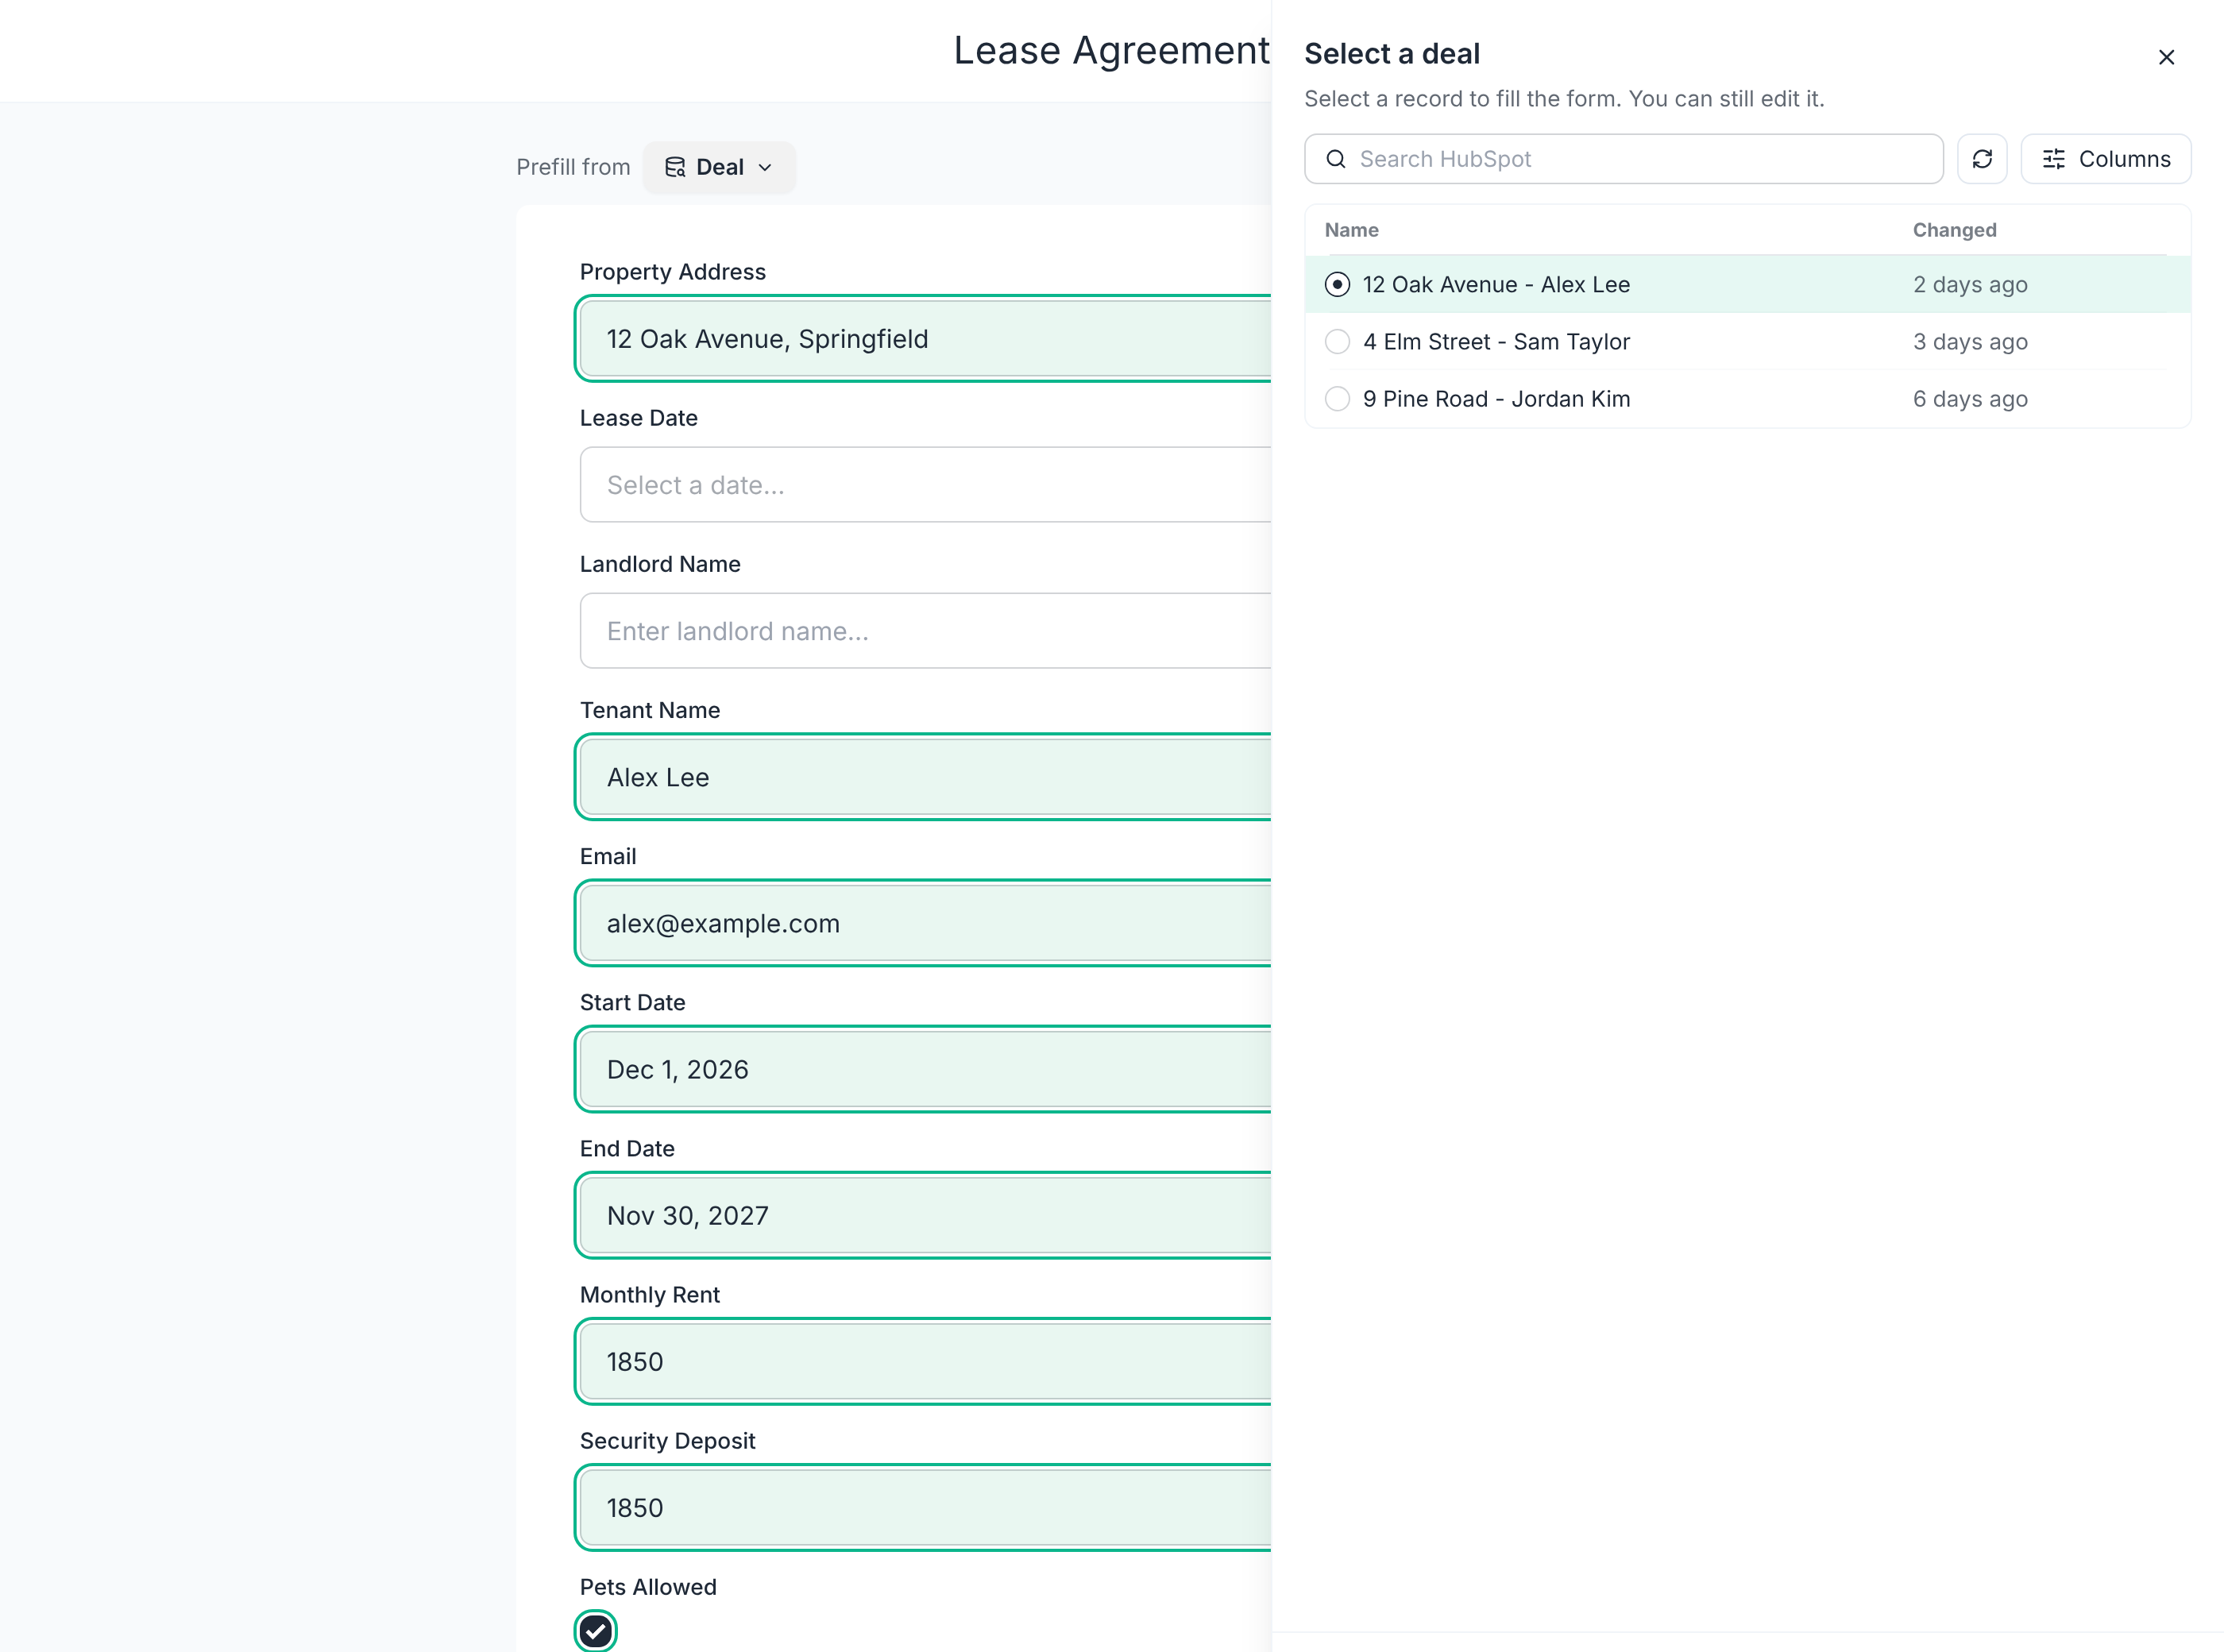
- Click Test in the workflow editor to open the form.
- Click the Deal button next to Prefill from, select a deal and click Apply. The fields fill in with the deal's details.
- Check the values, fill in anything that's missing, and submit.
The tenant and the landlord get an email with a link to review and sign the lease. When both have signed, each gets the signed PDF by email, and the signed copy is saved to the deal.
Signers don't need a TemplateDocs account: they sign in the browser, on any device.
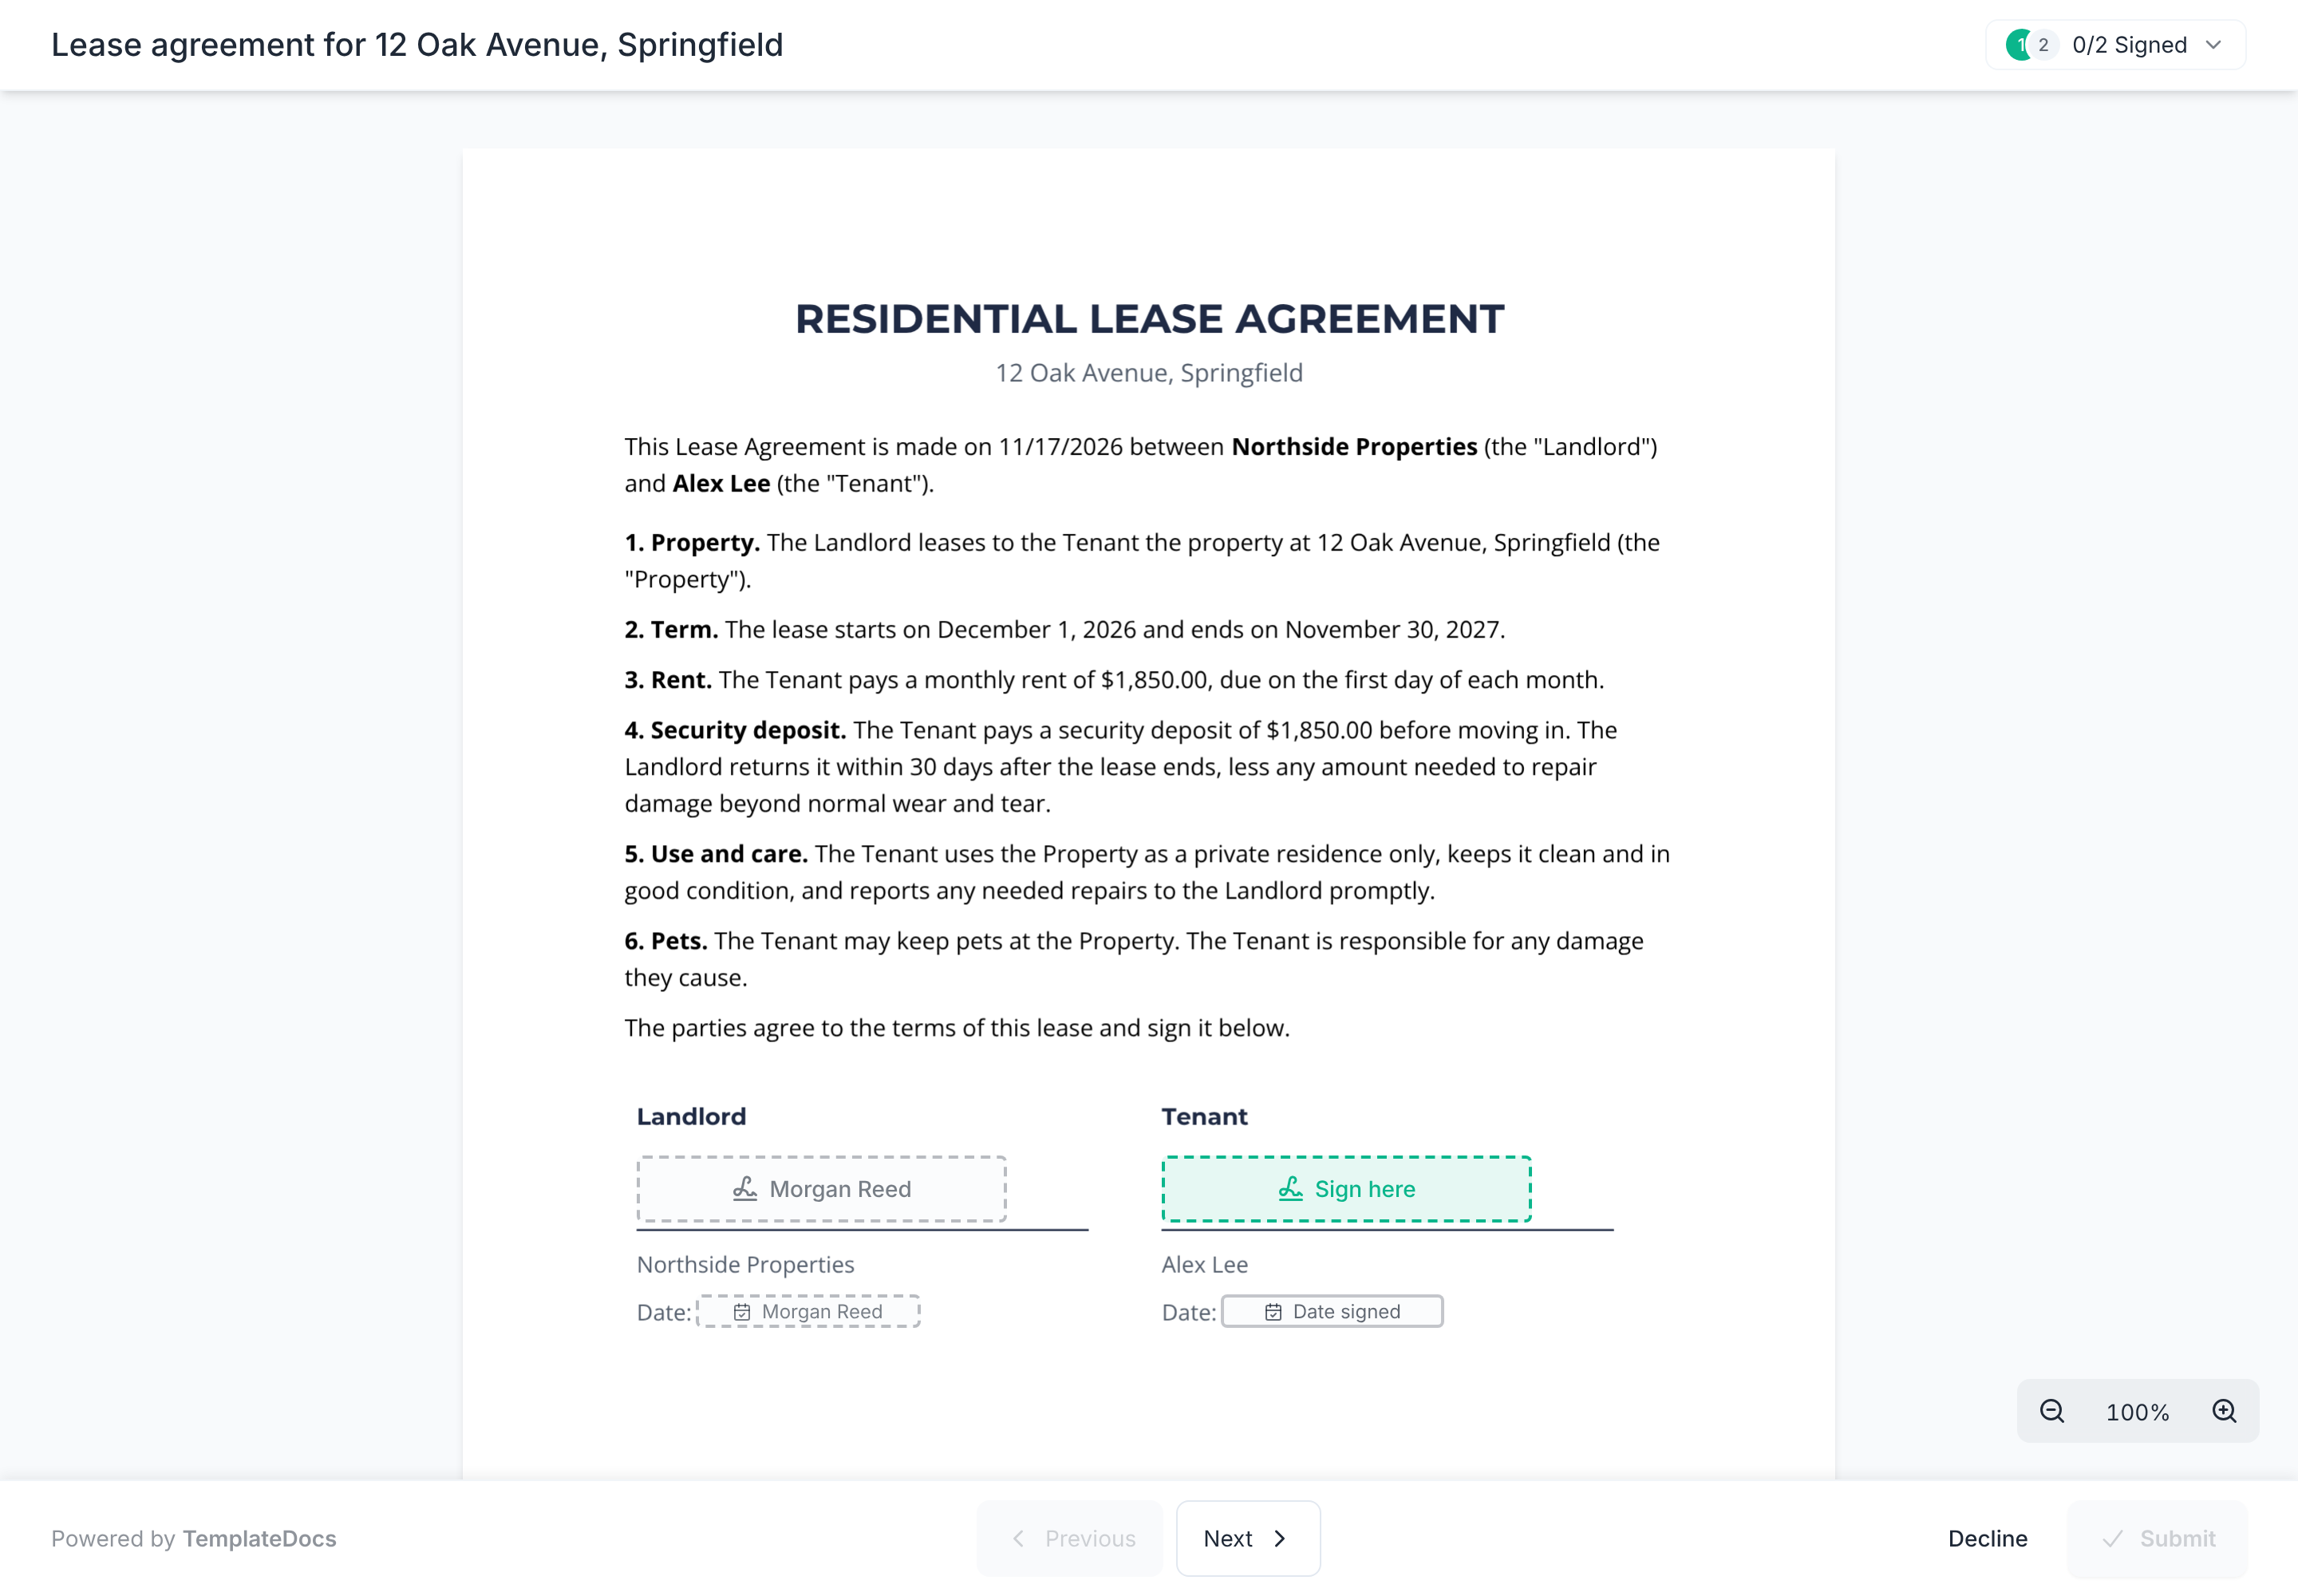
Once you've tested the workflow and are happy with the results, click Publish. Members of your TemplateDocs organization can then use the form to create lease agreements.
Test with a deal whose contact has your own email address before you send a lease to a real tenant.
Option B: Generate a lease agreement when a deal reaches a stage
Instead of opening a form for every deal, let a workflow watch your pipeline. When an agent moves a deal to a stage such as Lease approved, the workflow generates the lease agreement and sends it to the tenant and the landlord to sign.
1. Create the workflow from the template
- Open the lease template. On the Overview tab, choose Trigger from an event.
- Choose HubSpot and click Continue.
- Keep Collect signatures and Send an email on, name the workflow, and click Create workflow.
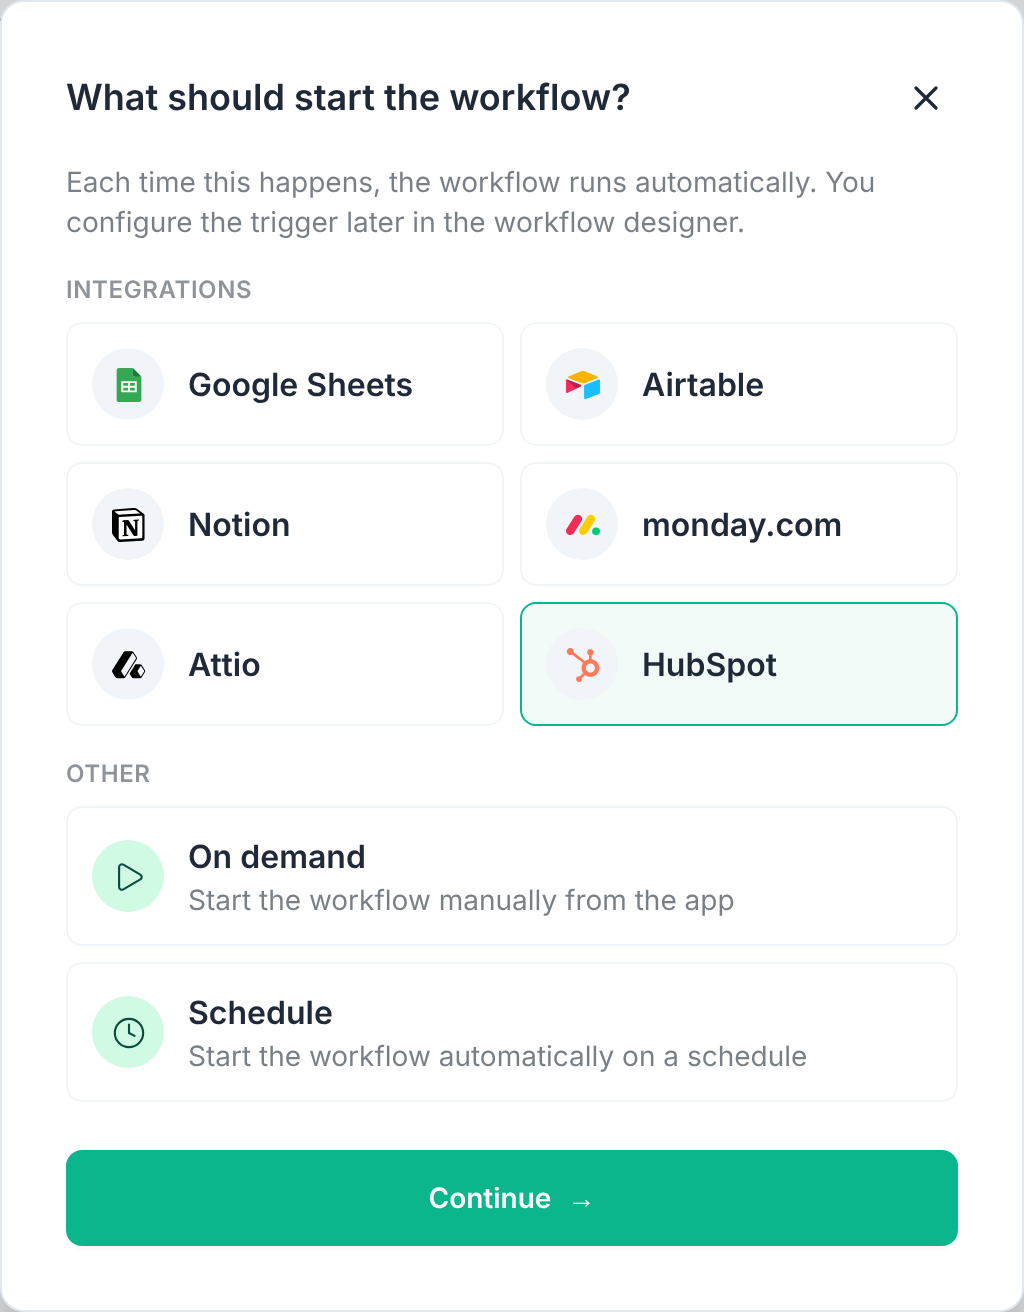
The workflow opens with the trigger selected.
2. Choose the deal stage and the tenant
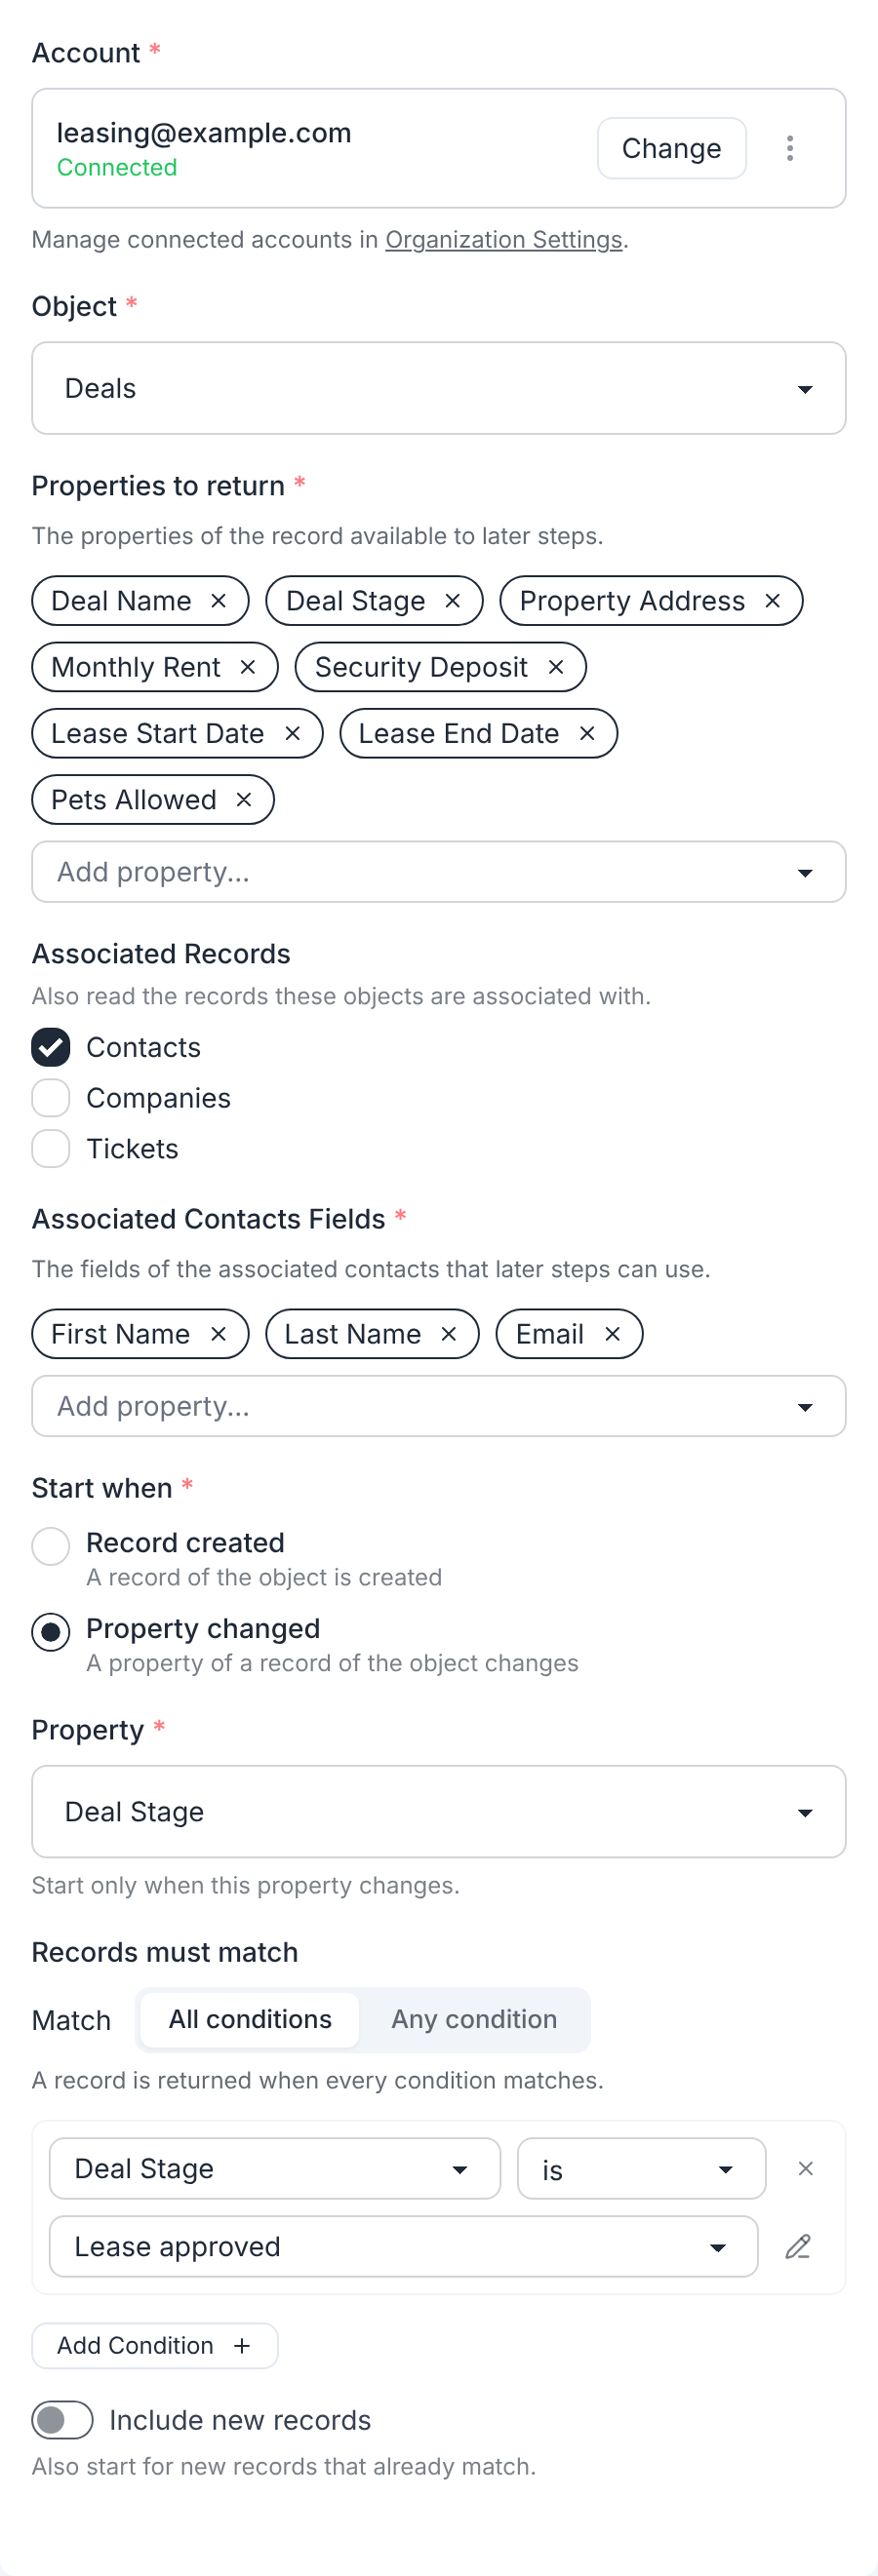
- Click Sign in under Account and choose the Deals object.
- Under Properties to return, click Add property and add the lease properties, such as Property Address, Monthly Rent and Lease Start Date.
- Under Associated Records, check Contacts. The trigger then reads the tenant's First Name, Last Name and Email along with the deal.
- Under Start when, choose Property changed and the Deal Stage property.
- Under Records must match, add a condition: Deal Stage is the stage that should send a lease, such as "Lease approved".
3. Review before sending (optional)
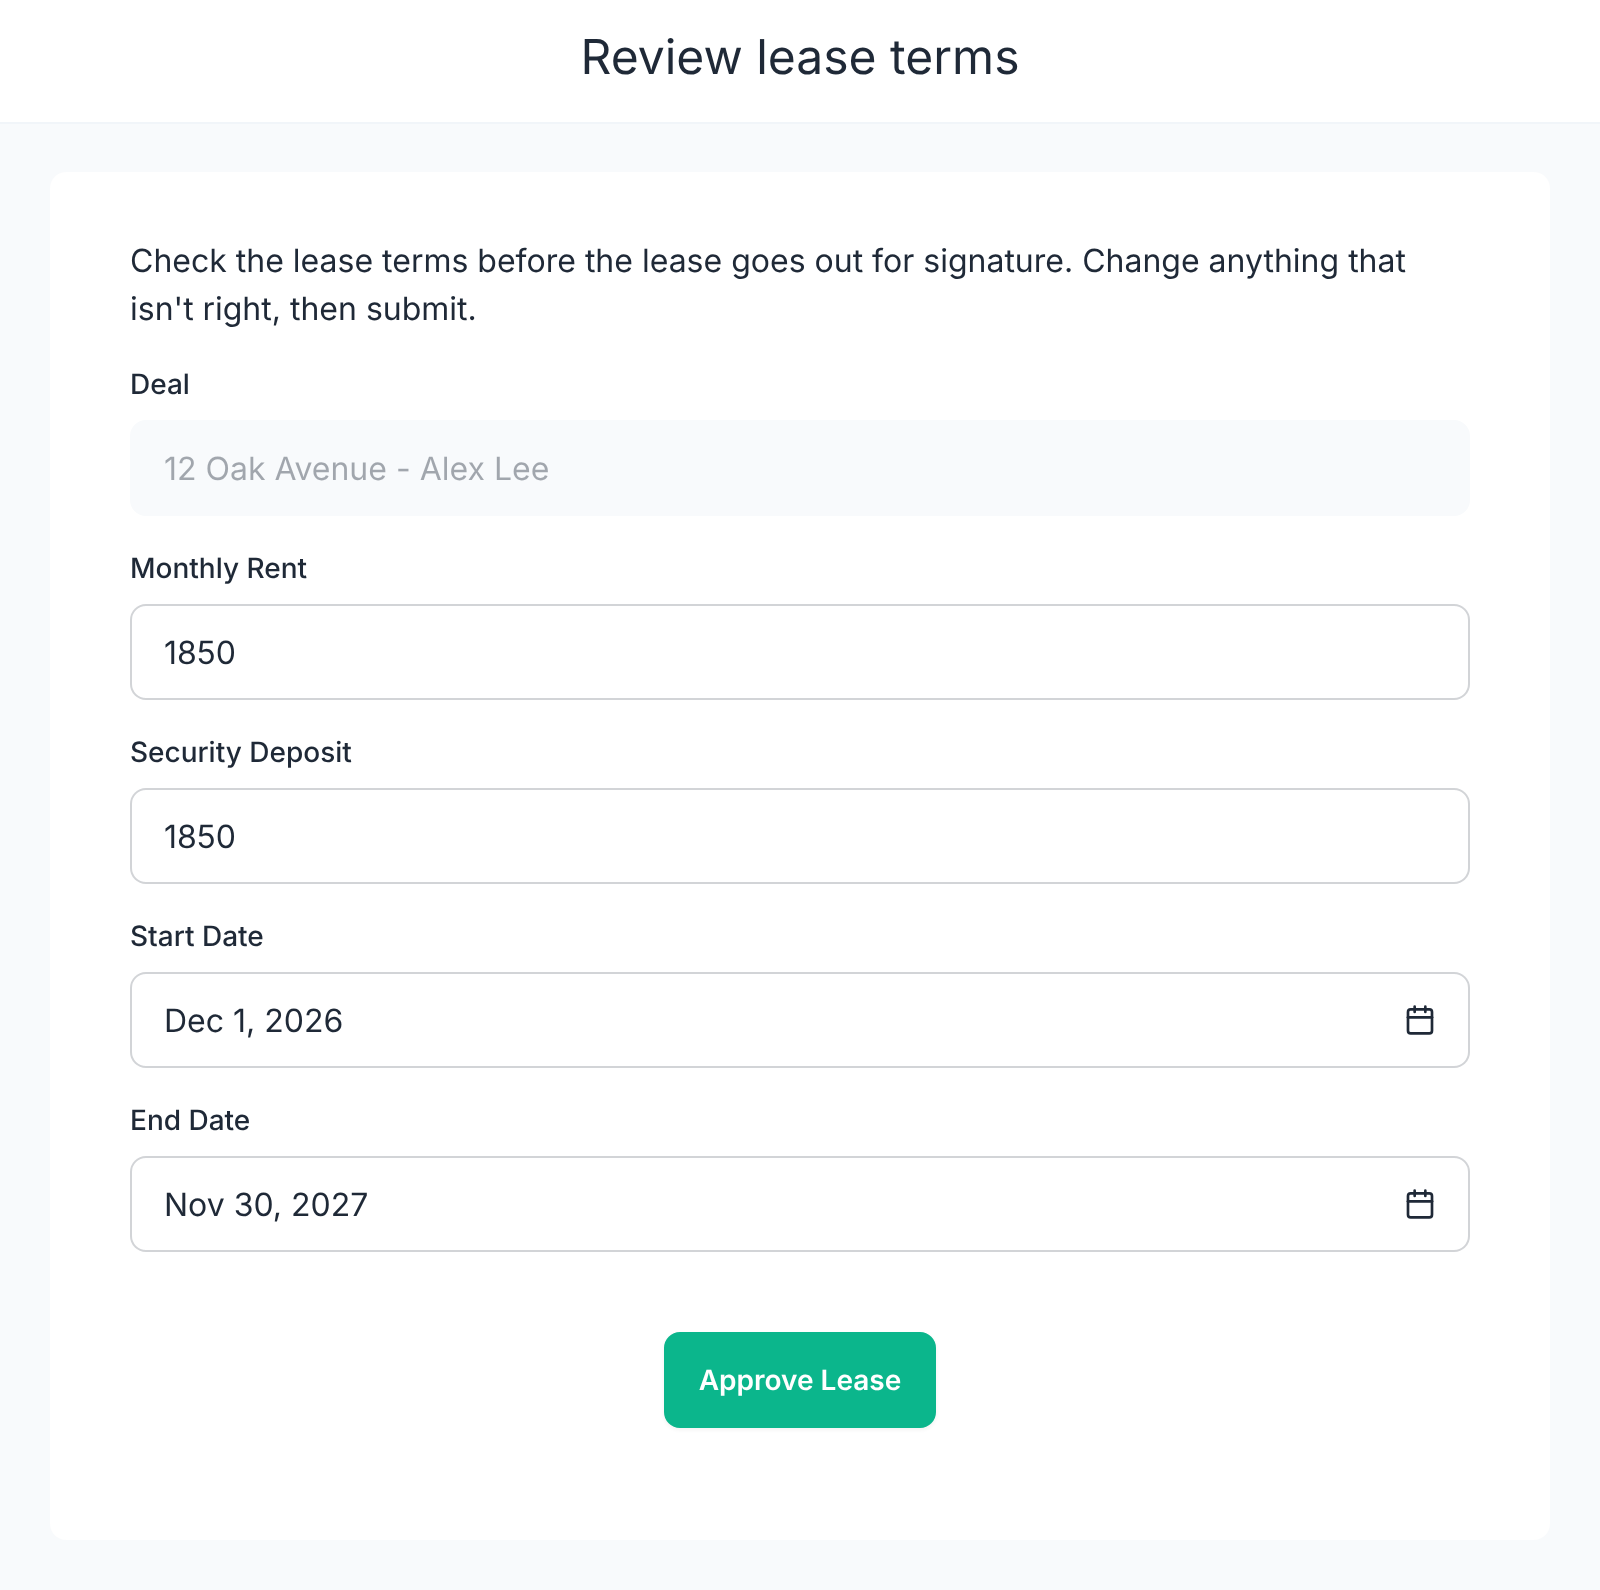
To check each lease before it goes out, add a review form. The workflow emails the form to a teammate and waits. The lease is created only after they submit it.
- Click the + below the trigger and add a Form step.
- Under Send To, enter the reviewer's email address.
- Optionally, add a Message, for example with the deal's Deal Name.
- Click Edit form and add the fields to review, such as a Monthly Rent number field and a Start Date date field. You can add read-only fields too, to provide more context to the reviewer. Here, the Deal name is read-only.
- Prefill the fields with the deal's properties, so the reviewer only changes them when needed.
- Use the form values in the Document step (next section).
4. Map the tags
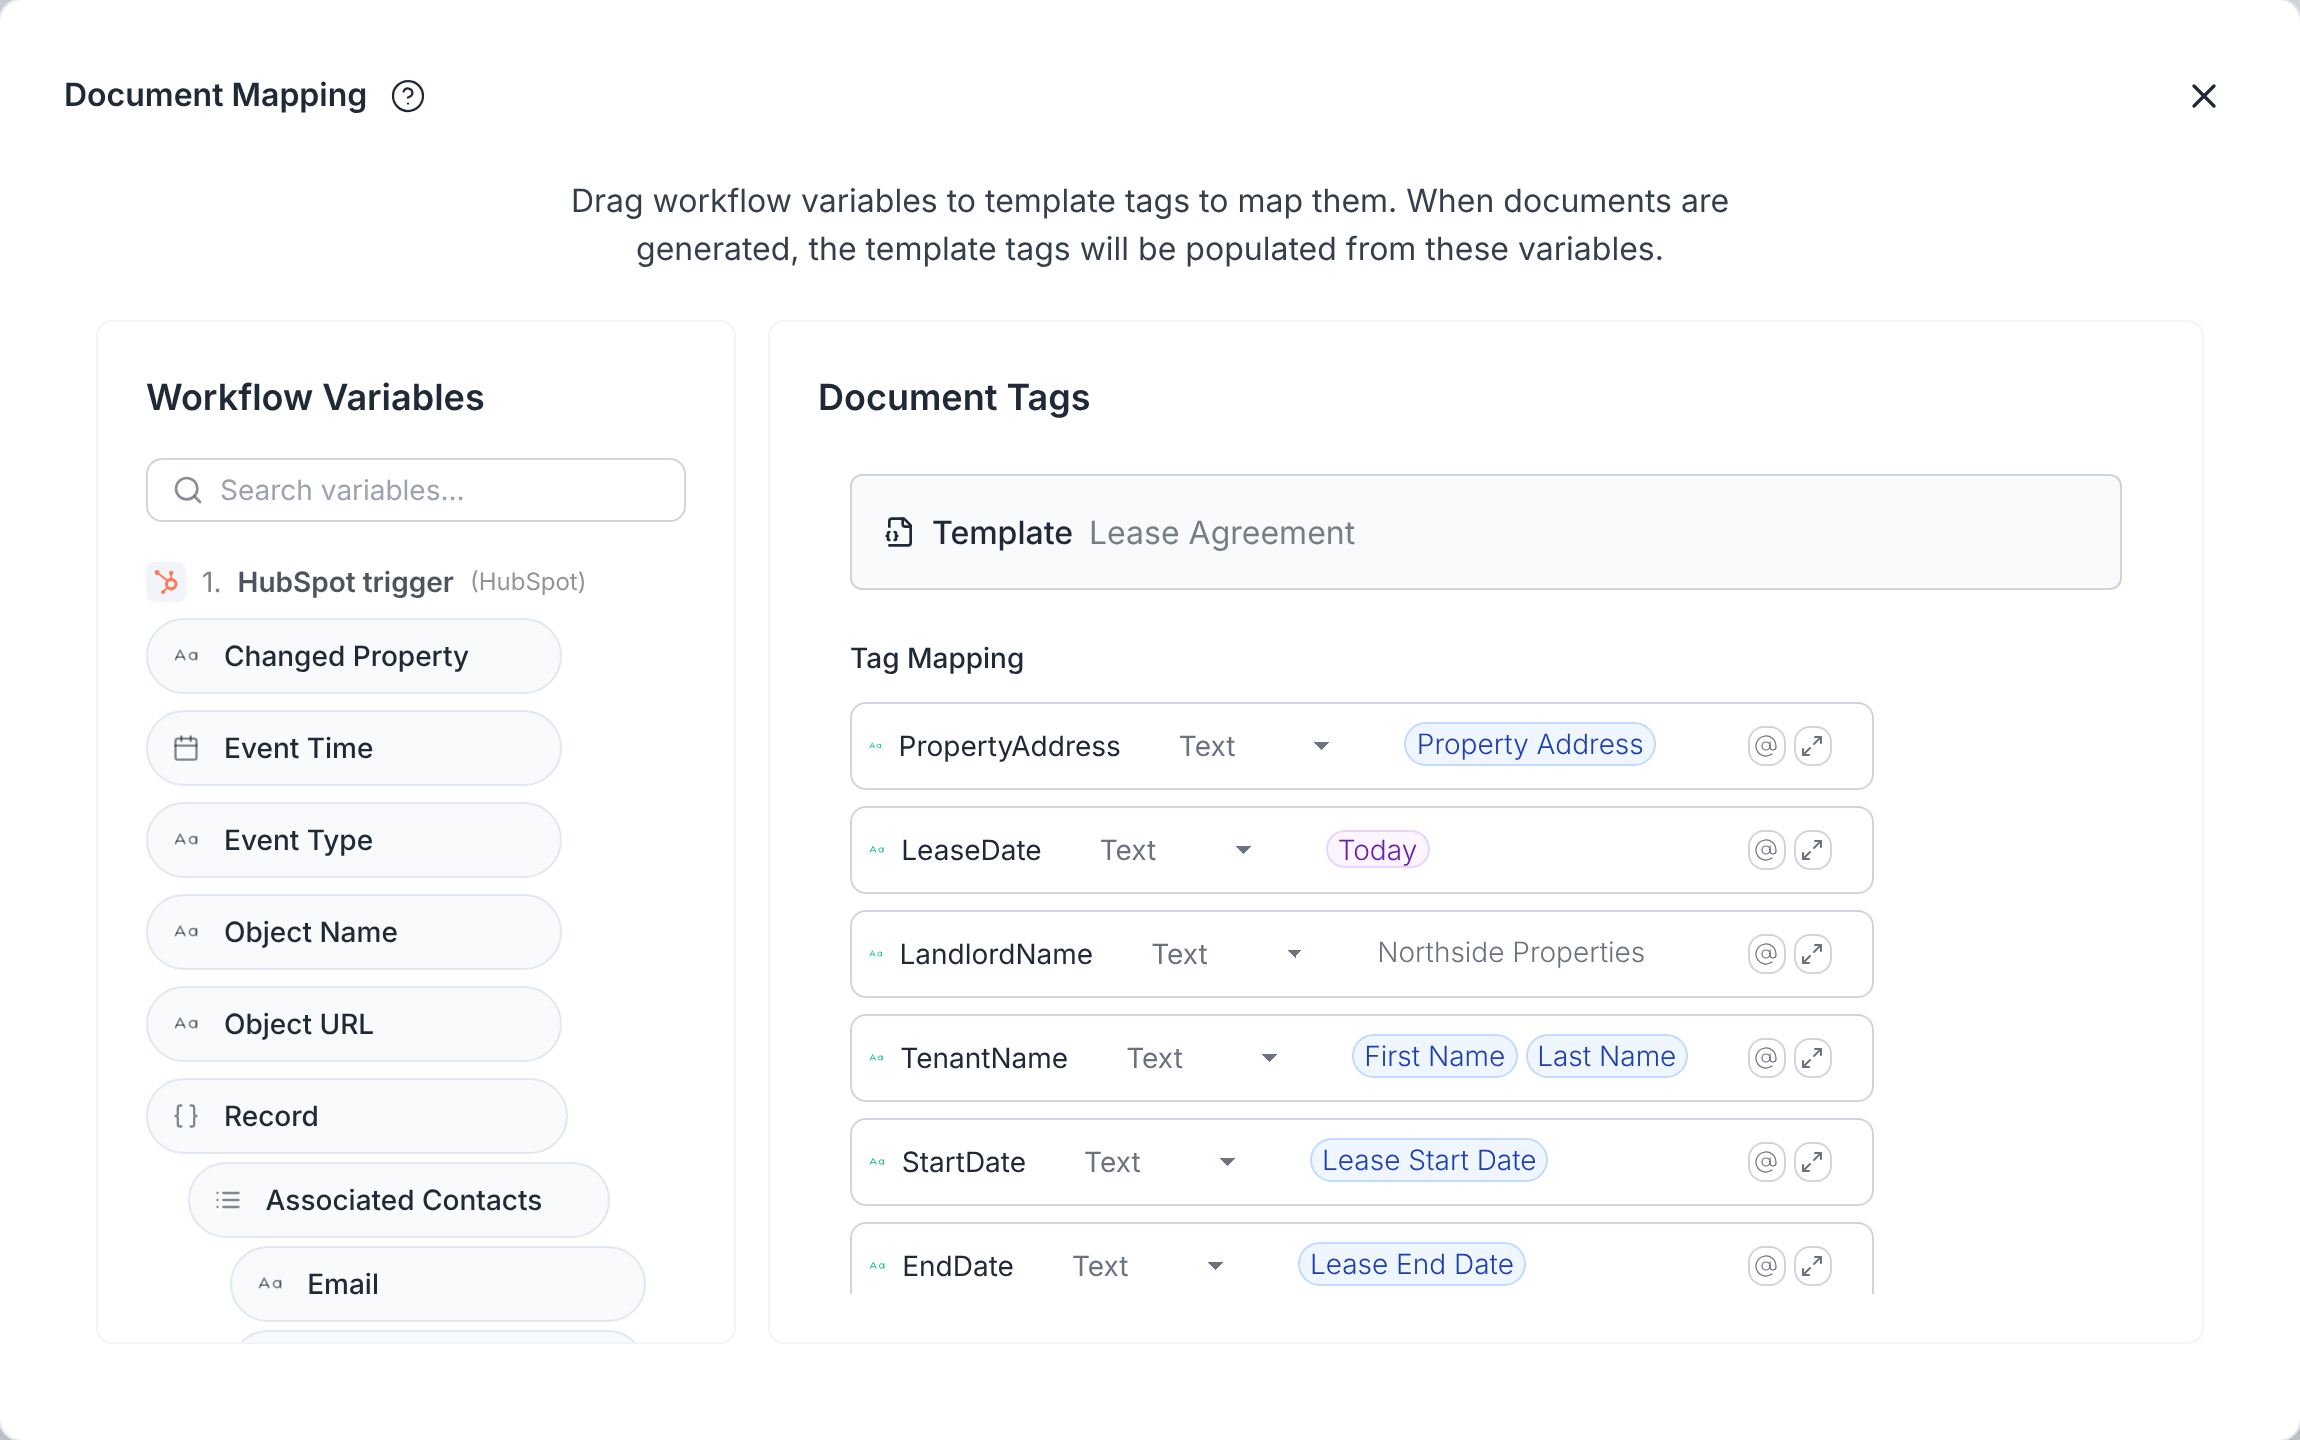
In the Document step, open the Tag Mapping and map each tag. Drag and drop variables from the menu on the left, or click Get suggestions to let TemplateDocs map the tags for you.
5. Configure the other steps
Follow the same steps as in Option A to configure the rest of the workflow:
- Send the lease agreement for e-signature
- Save the signed lease agreement back to the deal (optional)
6. Test and publish
- Click Test in the workflow editor and select a deal to try the workflow with it. Use your own email address for the signers while testing.
- When the lease looks right, click Publish. The trigger only listens while the workflow is published.
Other CRMs and data sources
HubSpot is only one of the CRMs that can fill in your lease agreements. The same template and workflow work with:
- Our native integrations for Airtable, Attio, Google Sheets, monday.com, Notion and more.
- Additional CRMs, such as Salesforce, Pipedrive or Zoho CRM, and property management software, through a webhook, Zapier or Make.
- A simple form that applicants fill in themselves.
For more ways to automate tenancy paperwork, see document automation for real estate.
Frequently asked questions
Which CRMs can I generate lease agreements from?
TemplateDocs reads deals and records directly from HubSpot, Airtable, Google Sheets, monday.com, Attio, Notion and more. Other systems can start a workflow with a webhook, directly or through Zapier or Make.
Can tenants and landlords sign the lease agreement online?
Yes. A Sign step emails each signer a link to sign the PDF lease agreement in the browser, on a computer, a tablet or a phone, without a TemplateDocs account. When everyone has signed, each signer gets a copy of the signed lease.
Are the e-signatures legally binding?
Electronic signatures are legally recognized under the US ESIGN Act and UETA, and the EU's eIDAS regulation, subject to applicable legal requirements. Every signed lease includes a signature certificate and an audit trail. See E-Signature Compliance.
Can I send the lease agreement as a PDF without e-signature?
Yes. Turn off Collect signatures when you create the workflow, and set the Email step's To Address to the tenant's email. The tenant gets the lease as a PDF or DOCX attachment, as you choose it.
Can I save the signed lease agreement back to my CRM?
Yes. Add a step after the Sign step that saves the signed lease agreement to the deal, and updates the deal's stage. In HubSpot, use a HubSpot - Add activity step to add a note with the signed lease attached, and a HubSpot - Write record step to move the deal to the next stage. Other CRMs, such as Attio, have similar steps.
Can one lease agreement template cover different terms?
Yes. Put optional clauses, such as a pet clause, between condition tags like {{>> PetsAllowed }} and {{<< }}. The clause appears only when the value is true, for example when a Pets Allowed checkbox is checked on the deal. See Conditions and Loops.
Will the generated lease agreement look exactly like my Word document?
Yes. Only the tags change. Fonts, headings, numbering, tables and layout are kept as they are in your Word lease agreement, and it is generated as a PDF file.
Can I generate lease agreements without a CRM?
Yes. Use a simple form that agents or applicants fill in, or keep your tenancies in Google Sheets, Airtable or Notion and generate a lease agreement for every new row.
What does it cost?
Each generated lease agreement uses credits, like any other document. Sending a lease for signature costs 10 credits, and each CRM action step, such as saving the signed lease to the deal, costs 1 credit. CRM triggers are free. See Credits and the pricing page for details.
